This guide starts with an introduction to Holosim. If you don’t care, then feel free to scroll down the Getting Started chapter_. If you already set up your account and are familiar with the interface, you can scroll even further down to Let’s Play!_
If you are a SAGE Starbased player, please note that there is no section listing the differences between the two games. That said, this guide does tend to spend a little more time on Holosim’s distinct gameplay features. Note, however, that this guide is written for players for whom Holosim is their first Star Atlas browser game experienc e.

Holosim is a free-to-play, top-down, grand strategy MMO browser game set in the year 2625, where three major space-faring factions—the MUD (humans), ONI (aliens), and the Ustur (robots)—dominate a small piece of the galaxy, called the Galia Expanse.
Seasonality
It’s a game that operates in seasons and chapters. Each season consists of one or more chapters that each last a set period of time. When a chapter ends, all progress is wiped and the game is reset. Prizes will be distributed, and the winners will be celebrated!
Each season will be distinct from the previous one in radical ways, which the team will announce beforehand. In some seasons, it’s all about the conflict between the three factions, whereas in other seasons, the factions may have to work together to fight a common enemy from outside their slice of the galaxy.
Most seasons will see the three factions at odds with one another, but some may see them all on the same side. There are some pretty radical plans to shake up each season, so stay tuned!
The chapters, on the other hand, will all adhere to the theme and questlines for that season. Both Chapters and Seasons will often introduce new functionality and features.
Free to Play with Rewards
Holosim is completely free to play, and comes with rewards which may be (partially) sponsored by 3rd parties outside the Star Atlas ecosystem.
Actively playing the game and ranking high on the leaderboard will reward players with Solana mainnet prizes! Though it is free-to-play, there are battle passes available that can be bought at each chapter. These may make your life a little easier and could help you climb the leaderboard a little faster.
Season 1 – Chapter 1 comes with rewards sponsored by Solfare!
We’ll go deeper into the rewards and subscriptions for Season 1 at the bottom of this article.
The Lore
As explained by the SAGE AI character:
Holosim is a conscious simulator of ultra-realistic realities. It can spin up any scenario the Council of Peace wants to simulate. And when I say any scenario, I mean everything from the final days before the Convergence War to theoretical outcomes where the Tufa broods abandon the Cataclysm and sweep across the Galia Expanse, turning civilization into cosmic mulch.
Per the Council of Peace’s request, Holosim has hand-picked you to participate in an interesting scenario. A competition, where you will have to cooperate with other Captains of your own faction to defeat the opposing faction’s representatives.
The proposal is simple: The faction that first provides the necessary Faction Infrastructure Contracts (FICs) to all the Starbases in its territory wins.
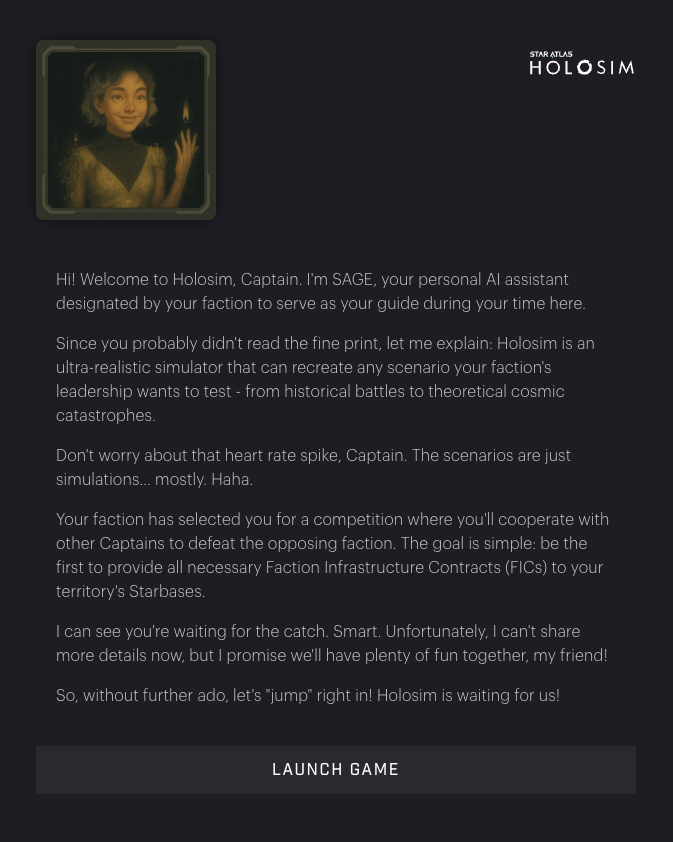
Holosim – SAGE’s Introduction
Contents
The rest of this guide is broken down into the following chapters and sections:
- Getting Started
- The Interface
- The Header Bar
- The Navigation Bar
- The Map
- The Sidebar
- Let’s Play!
- Daily Boost
- Quests
- Expertise Quests
- Quest Rewards
- Tips
- Starbase Controls
- The Hangar
- Forming a New Fleet
- Fleet Hangar Actions
- Hangar Automation
- Fleet Actions
- Movement
- Crafting
- Managing Crafting Jobs
- Build Permits
- Mining
- Miner Ships
- Scanning
- Data Runners
- Your Session
- Securing your Session
- Restoring your Session
- 24/7 Online
- Automation
- Mining
- Transport
- Patrol
- Toggling Automation
- Combat
- Attacking
- Loot
- Fleeing
- Repairs
- Territorial Conquest – Flipping Starbases
- Destroyed Fleets
- Toolkits
- Recovery & Repair
- Rewards
- Battle Pass
- Troubleshooting
1. Getting Started
In Holosim, players choose a faction they want to represent and then join the game with a few crew and ships, ready to make a name for themselves. Several chains of quests are available with the aim of getting you up to speed and contributing to that season’s goals.
If you haven’t done so already, go to https://holosim.staratlas.com, where, if this is your first time, you will be greeted by the SAGE AI character (see screenshot above). Read her welcome message and then go on to create your character. You can give it a name, and you will have to choose a faction.
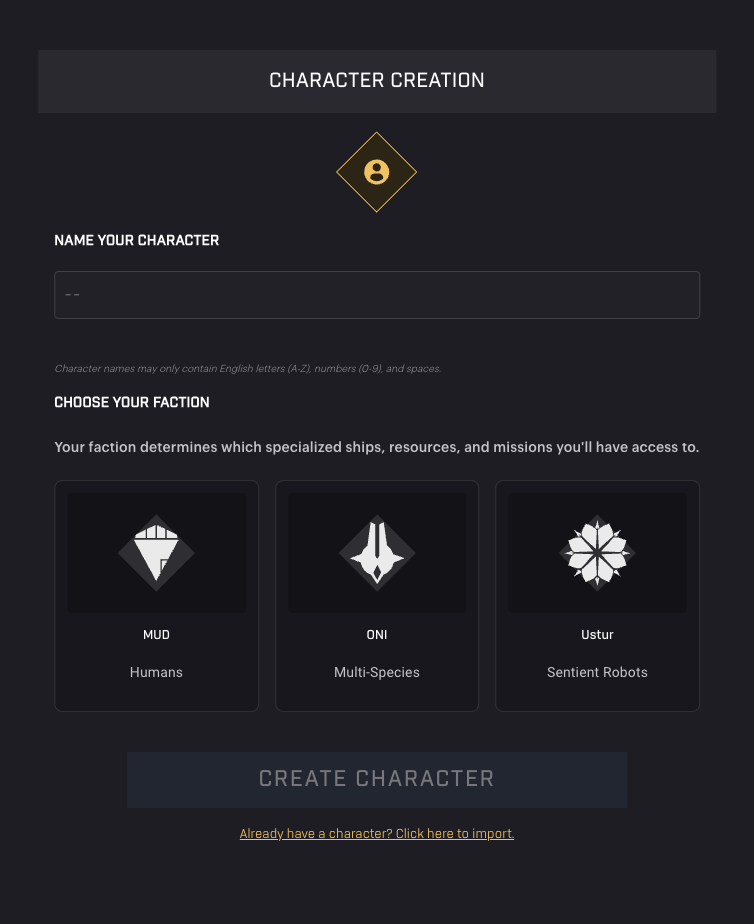
Holosim – Character Creation
Note that the faction you choose here does not have to match a faction you may have chosen in SAGE previously (if you play SAGE as well). You can, of course, keep them similar, but there is no obligation (or benefit) to do so.
After you enter the game, you will see two buttons trying to draw your attention in the bottom right navigation bar: Quests and Chat. You can ignore these for a moment while we acquaint you with the interface.
2. The Interface
The interface can be divided into three major areas:
- The Header Bar — This shows you important information, such as your name, licenses, xp, level, and finances, plus has some handy buttons.
- The Navigation Bar (bottom right) — A list of buttons that open important areas of the game, such as your quests and chat.
- The Galaxy Map — The main portion of your screen. The moment you click anywhere on the map, the Sector Panel will open on the left side of the screen. We’ll go into this in more detail below.
There is a fourth item prominently featured, which shows the main quest you are currently on. Clicking it will open the quest window and scroll to that quest (if scrolling is required).
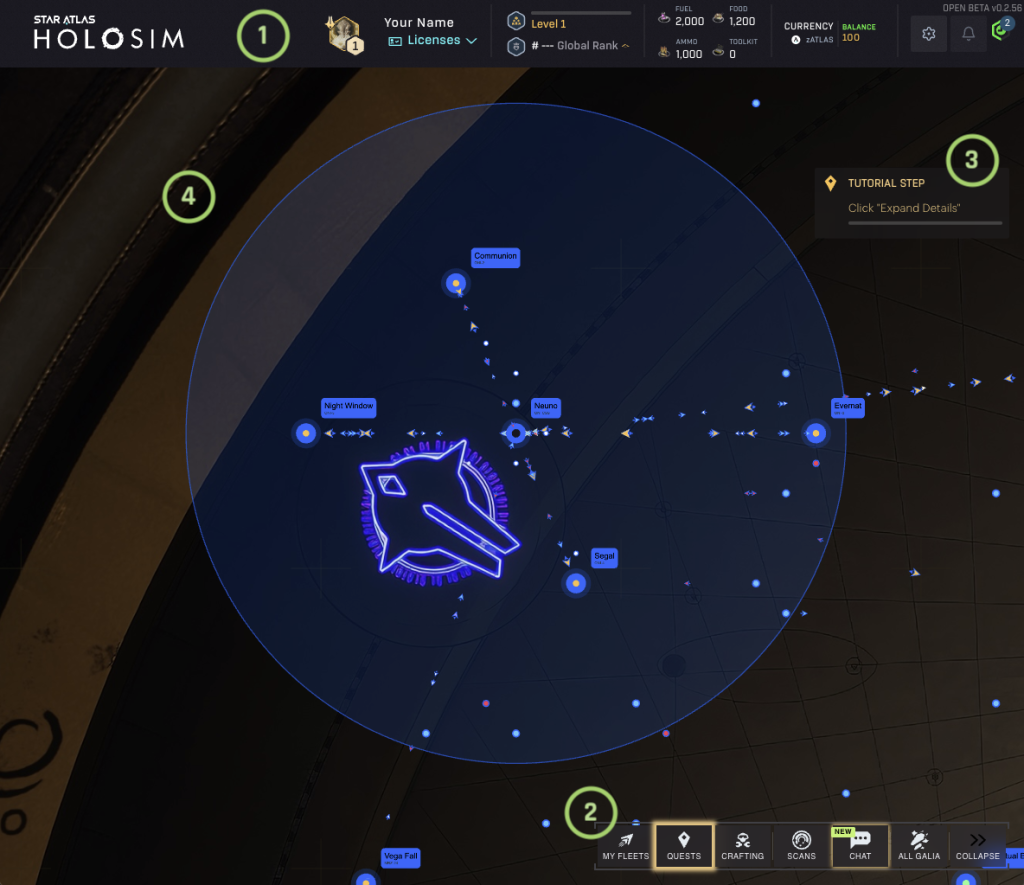
Holosim – The User Interface
Let’s dive a little deeper!

Holosim – The Header Bar
Header Bar
The top bar, or header bar, has the following items, from left to right:
- License XP progress — You’ll earn XP separately for each type of action you perform in the game. By clicking the Licenses toggle, a drop-down will open, displaying the various licenses available in-game. Each License is capped at 70k XP/day.
- Piloting: (sub)warping any fleet
- Data Running: scanning for SDUs (successful scans earn a lot more XP than failed ones)
- Mining: mining any resource
- Crafting: using your crew to craft various recipes (crafting ships reward the most XP)
- Combat: fighting enemy fleets.
- Level/Global Rank — Earning XP will make you level up. This is a crucial element of Holosim, as many recipes have level requirements. You unlock new recipes (and with that, new ships) by levelling up. XP you earn in your licenses contributes to this total, but the far bigger source is the XP rewarded by quests.
- Consumables count (R4) — This part shows the amount of Fuel, Food, Ammo, and Toolkits that you have at your Central Space Station (CSS) if you don’t have any Starbase / Star system selected. If you do, then it will show you the totals you have over there instead. It doesn’t count resources present at other Starbases. This is especially handy at the start as you will likely use the CSS as your base of operations for quite a while.
- Balance — This shows you your zAtlas balance, the in-game currency. You can earn this in a variety of ways: completing quests, selling items on the marketplace, redeeming contracts, and earning Loyalty Points by contributing to upgrading Starbases.
- Settings Button— Here, you can adjust various settings and save your game (more on that below).
- Transaction Queue Button— Here, you can check transactions happening in-game. It’s a useful tool for identifying problems and determining if any fleet is not working as intended. In general, you should not need this.

Holosim – The Navigation Bar
Navigation Bar
From left to right:
- My Fleets — This opens a small dialog containing a list of all your fleets. You can access each one by clicking on its image (showing ships inside the fleet), its name, or the two small arrows to the right of its name. The yellow box at the right is the automation menu, which will be disabled at the start of the game. Check the Automation chapter below to learn more.
- Quests — This accesses the quests dialog, which is essential to the game. Quest rewards are what propel you most, especially in the early stages of the game. They will also guide you through the game, which is why we can keep this Guide relatively small. More on Quests in the chapter below!
- Crafting + Scans — These are not yet functional.
- Chat — This toggles the chat window on and off. Here you can chat with other players who are in your faction, at that moment in time. Alternatively, you can chat with an AI bot, whom you can ask questions about the game.
- All Galia — Not yet functional either
- Collapse/Expand — Reduces the size of the bar by hiding all elements but My Fleets. Expand opens it back up.
The Map
The largest portion of the game’s interface displays the map of the Galia Expanse, a remote region of the galaxy where all Star Atlas games are set.
Navigating around the map is quite intuitive if you have played similar games before. You can use the mouse wheel to zoom in and out, and you can drag the map to move around.
Although it’s not immediately obvious, the map is square, consisting of 101 x 101 square sectors, which totals 10,201 square sectors. When you click on the map, you’re selecting one such sector, which will light up under your mouse cursor. Additionally, a panel will slide in from the left, showing you information about the sector you selected.
You will see three circles on the map, which signify the Safe Zone of each faction. Good to know: fleets from other factions can not enter this area.
Near the center of this circle is where you find your faction’s home Star System, which is also where its Central Space Station resides. This is where your adventures start, and you will select the sector containing that star system quite often, in order to get access to the sidebar and the Starbase Controls it has. However, let’s take a step back and examine the sidebar briefly.
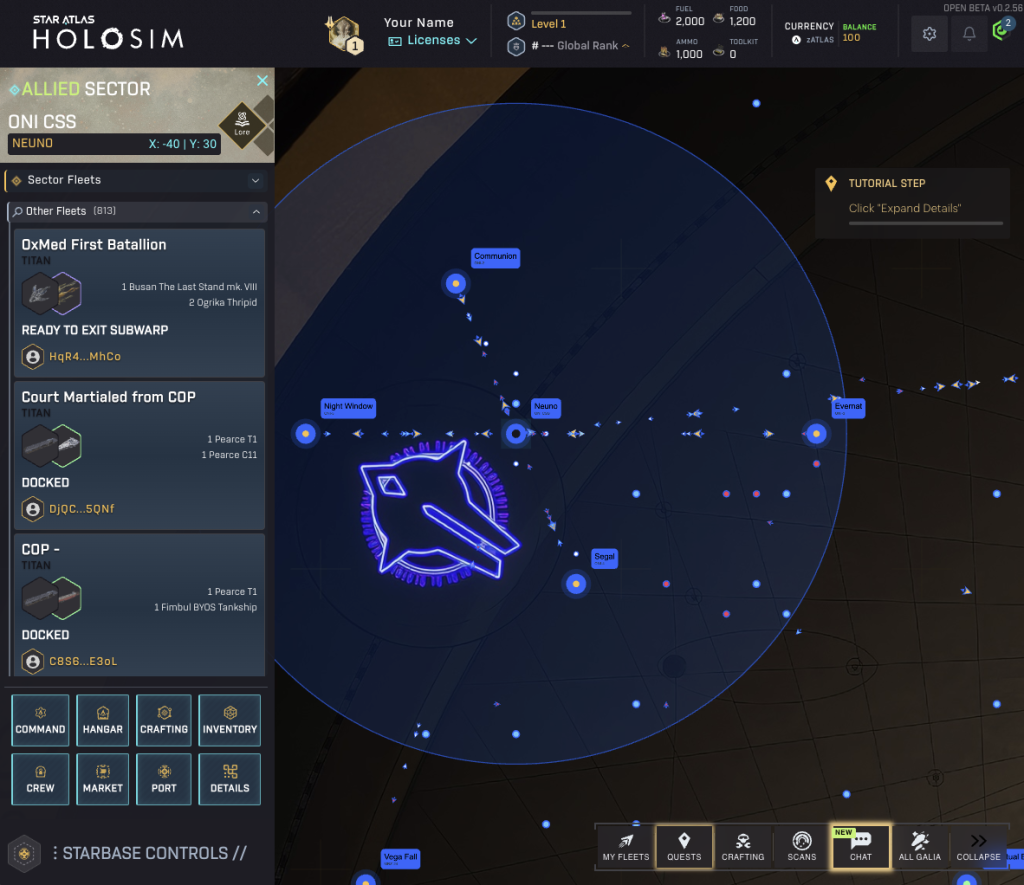
Holosim – The User Interface with the sidebar on the Central Space Station
The Sidebar
When you click anywhere on the map, a sidebar will appear on the left-hand side, showing (top to bottom):
- The name of the star system there (if any), plus a button that opens its lore description. Whether it contains a star system or not, the coordinates of the sector will be shown (each axis running from -50 to 50).
- A list of your own fleets present in that sector (if any); Clicking one will select that fleet.
- A list of all other fleets present in that square (if any)
- A list with buttons of activities you can perform, which will always include at least the Command button. More buttons are shown when selecting a sector with a Star System in it. We’ll go deeper into these Starbase Controls in the chapter by the same name below.
3. Let’s Play!
That covers most of the interface. Time to get this game started!
The first thing you’ll want to do is click the Quests button in the Navigation bar and select the Tutorial tab. Alternatively, you can click on the active quest that appears on the right side of your screen to end up here as well.
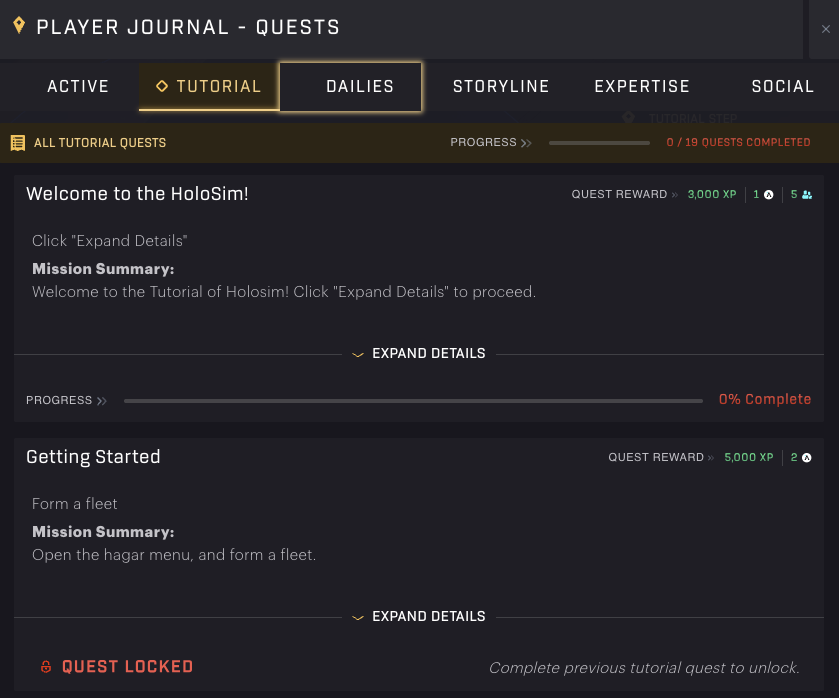
Holosim – Quests (Tutorials)
We’ll go deeper into the quests and the various categories below. For now, let’s focus on the task at hand.
The first quest attempts to explain an important characteristic of how the quests interface works: they (almost) always have a description (often a story) that adds color and some clarification to the quest objective. To view this, you’d have to click the “Expand Details” toggle, which is positioned centrally, near the bottom of the quest “block”.
The minute you click it, you complete the quest’s objective, and you will see the quest change to:
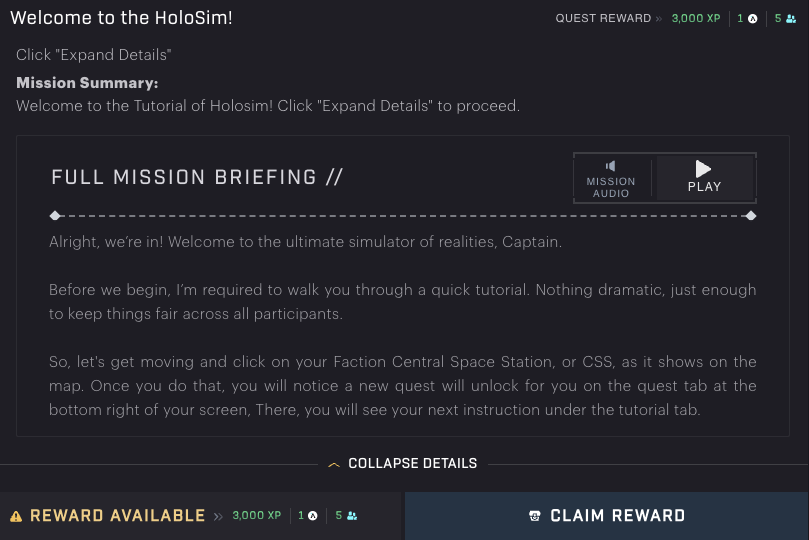
Holosim – Quest Completed – Claim Reward
All other quests follow the same mechanic, though you often have to take more time-consuming actions that will help you improve your position in-game.
When you click Claim Reward, you’ll get the rewards listed (see below) added to your totals. Where it says “Reward Available” in the screenshot above, it will be replaced with “Reward Claimed”.
Daily Boost
Before moving on to the next quest, which will actually guide you through the game mechanics, now is a great time to complete that first daily quest (the only one available to you). It requires nothing more than a click to complete, but rewards you handsomely with a (for your level) very substantial amount of XP and crew members.

Holosim – Daily Quest Rewards
Because this reward is so great, you will absolutely want to spend a minute per day at least to grab these rewards, which will greatly improve your game the next time you have time to play in earnest.
With quests forming the red line throughout the game, let’s look a little closer at these next!
4. Quests
Quests are crucial to the game in more ways than one. Not only do they explain the gameplay to new players and offer a compelling storyline for people to follow, but they are also the primary way to earn zATLAS early on and the only way to acquire more crew members.
There are five types of quests, which can be found through the respective tabs at the top of the Quests dialog:
- Tutorial — Start here; Until you’ve finished these, Storyline & Expertise quests will remain locked. These quests will try to get you up to speed on how the game works and how you can
- Dailies — A short list of quests that will reset daily (at 0:00 UTC). Try to do these as soon as possible. The top one is available to everyone and only costs a click: do not miss this. This is the easiest and fastest (at the start) way to earn additional crew members.
- Storyline — The Tutorial quests already introduce a few main characters and have a fun storyline going. When you finish the last quest there, this category will unlock. The story continues, but the quests move focus from simply getting up to speed to getting shit done.
- Expertise — These will unlock only after you have made some decent headway into the Storyline quests. There are four different disciplines or professions that you can specialize in here. So far, during the beta, there was no need to specialize; you could just do all of them if you wanted. These quests have a direct connection to the Season’s goal. For Season 1, this means crafting and redeeming contracts.
- Social — These are quests that you can pick up whenever you want, if you haven’t already. They are social quests that are meant to help Star Atlas spread the word and boost their engagement. If you enjoy the game, why not lend a hand?
There is one more tab: Active. This shows you the daily clicker-quest, your current Tutorial quest, and your current Storyline quest. In general, you’ll either see a Tutorial quest or a storyline quest, as the two do not have much (if any) overlap. You need to finish the tutorials before you can start with Storyline after all. There is also a link to Expertise quests, but no quests are displayed directly here. There is also a pointer to Social quests here, but no active quests are shown.
Expertise Quests
Expertise quests look slightly different from the other quests. There are 4 disciplines (Freighting, Mining, Figghting, and Data Running), and you can safely progress through them all. There is, as of season 1, no obligation to choose only one of these. Future seasons may change that, however!
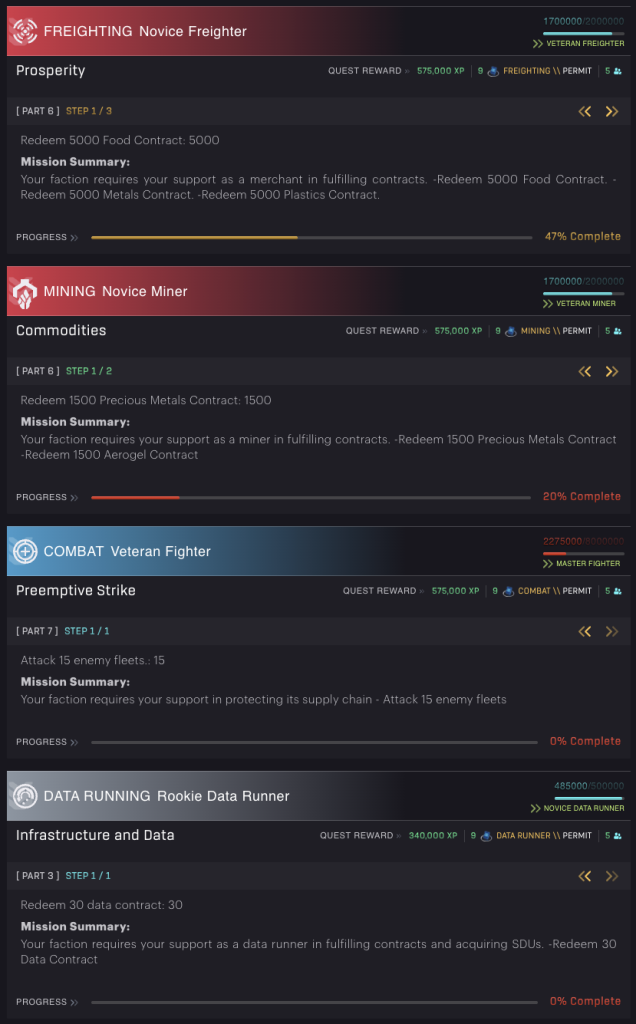
Holosim – Expertise Quests [ongoing]
Quest Rewards
Let’s briefly zoom in on the quest rewards. Notice that these are both listed at the top right of a quest, but also to the left of the Claim Reward button once a quest has been completed.
- XP — Every quest will reward XP; it is how you level up your account. This is important as many things are locked by level in this game. Only by gaining levels can you unlock access to both features and recipes.
- zAtlas — This is the in-game currency, equivalent to another game’s “gold”. You’ll need this to craft items (they have a crafting cost) and to acquire items on the marketplaces inside the game.
- Crew — Whether it is flying a ship or crafting an item, you’ll need crew members to make it happen. Though you may be running short on zAtlas early on in the game, it is really the Crew members who will forever want more of it, mostly. The more crew you have, the more ships you can fly, and the faster you can craft things.
- Permits — Later on in the game, you will need special Build Permits to craft bigger ships. We’ll expand on these permits in the Crafting section below.
Tips
Some quests have multiple steps. The description often asks you to do A, B & C, but the completion requirements show three individual steps, with the first step asking to complete only A. If you use the arrow to click through the sub-quests, you will see that B and C will come in the next steps.
It is essential that you complete step 1 before attempting to proceed to step 2. In other words: You have to do these in order! Doing them out of order would be a waste of effort, as the progression of step 2 is not measured until step 1 has been fully completed.
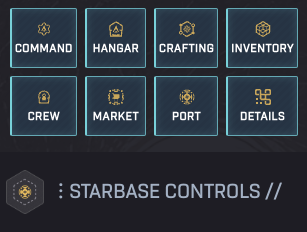
Holosim – Starbase Controls (CSS)
5. Starbase Controls
When you click on a sector that has a Star system, the sidebar to the left will show you seven (or eight if you are at your CSS) buttons through which you can interact with the Starbase that is present there, and open up certain specific information.
Let’s go over these buttons briefly:
- Command — The Command button is the only button that is always present, regardless of the sector you select. It is used for combat and is therefore further described in the Combat chapter.
- Hangar — Allows you to create and disband fleets, and to refuel, rearm, and resupply them. You can also take their cargo and move it into the Starbase. See the Hanger chapter below for more information on this panel.
- Crafting — This is where you craft assets, using other assets as ingredients. You will need crew to do this, and the more you have, the faster you can craft. See the Crafting chapter below for more information.
- Inventory — Allows you to move any cargo present at the Starbase to the cargohold of a fleet. Just select one (or more) assets, enter the number (or click the number shown if you want all), and then select a fleet at the bottom of the popup. Hit Transfer to Fleet to fill up that fleet’s cargo space
- Crew — Shows you the crew available at the Starbase. Not the most useful view
- Market — Opens the Marketplace present at this Starbase. Here you can buy anything your heart desires. That is.. if you have enough zAtlas! You can also sell anything you no longer need here. Perhaps most importantly: Here you can “redeem” contracts by selling them into a Buy order from the team
- Port — This option only appears when you have selected your home system with the Central Space Station (CSS). You don’t really need this, unless you need to troubleshoot missing ships (see the Troubleshooting chapter at the end).
- Details — Best used to quickly see what mineable resources are available in the system. The other data shown is most likely not very relevant to you.
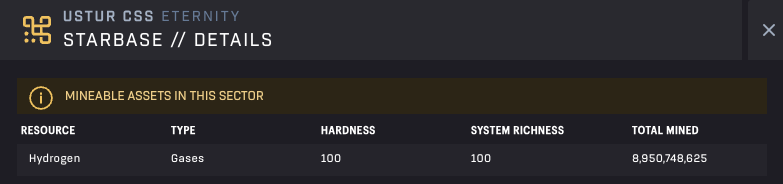
Holosim – Star System Details
6. The Hangar
The hangar is likely one of the first panels you’ll end up in, as the second tutorial quest wants you to create a fleet. Though you will, soon enough, be crafting (and perhaps buying) ships, you can only use them when put into a fleet. And though a fleet can absolutely consist of a single ship, you will still first need to form a fleet with it. Creating fleets is done inside the Hangar of a Starbase.
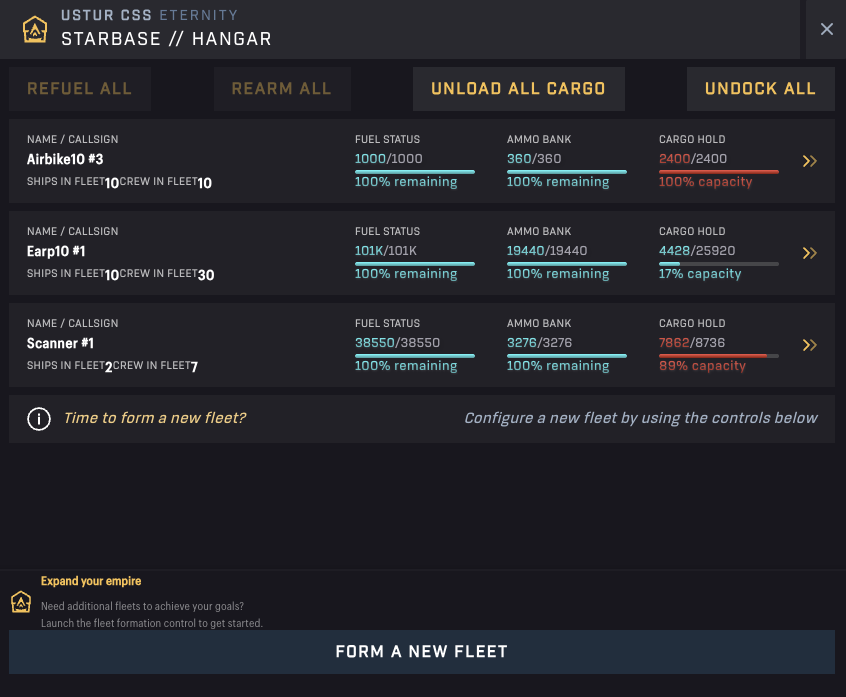
Holosim – Hangar
But let’s start at the top! The Hangar shows you all fleets that are docked with the Starbase. You can click on any one of them to interact with them directly, but here you have four quick action buttons that apply the same action to all fleets present:
- Refuel All — Refuels all ships to the max possible (depending on the Fuel you have available at that Starbase)
- Rearm All — Will resupply all fleets with max ammunition (again, to the extent this is available at the Starbase)
- Unload All Cargo — Will unload all cargo (not fuel or ammunition, unless these were in the cargo hold of the ship as well)
- Undock All — Will kick all fleets out of the Hangar, into space. Here you can control them using the Fleet Controls (see Fleet Actions chapter).
Lastly, there is the Form a New Fleet button at the bottom, which allows you to do exactly what it advertises.
Holosim – Hangar – Form a New Fleet
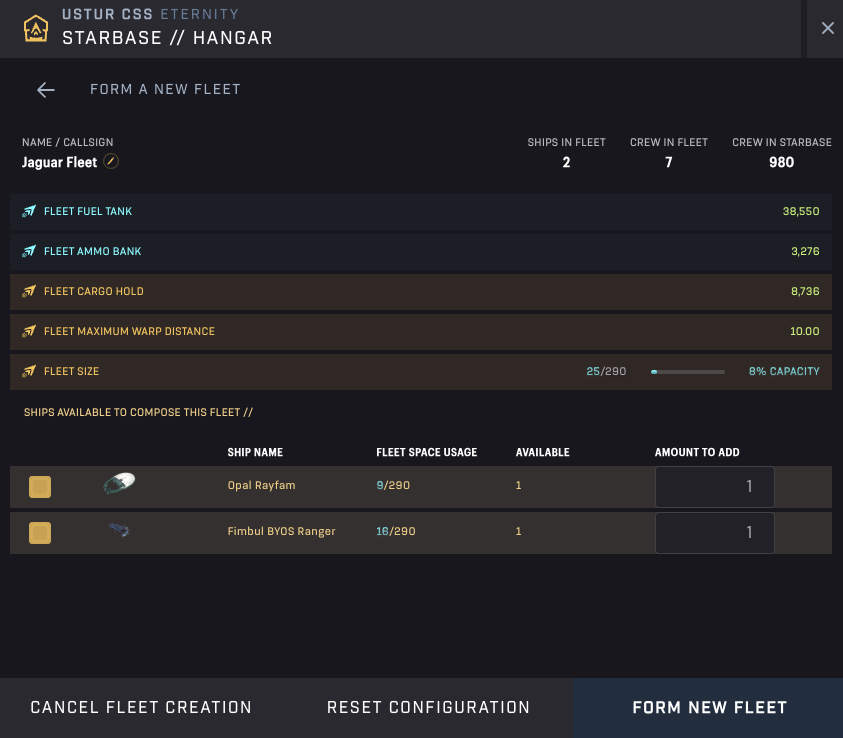
Forming a New Fleet
In the Fleet Formation panel, you will see all ships that are present at the Starbase that are not currently part of a fleet. When you craft ships and have completed the crafting job, your ships will appear here (if it’s the same starbase).
You can select the ship models and the number of each model you want to include (if you have multiple). There are a few constraints that are important here:
- Fleet size — Game design assigns a numeric value to each ship (size) and limits the maximum fleet size based on that number. A fleet can not contain more than 290 worth in ship points. As you can imagine, larger ships are worth more points. The Fleet Space Usage column shows you both what a ship costs in terms of points and the maximum fleet size limit. The Fleet Size bar right above shows you the sum of all the ships’ points and the capacity (of the limit) they are using.
- Crew — A fleet can not be flown without a crew, and that means that creating a fleet will take crew away from your crafting force at that Starbase. It also means that you can not create new fleets if all available crew are (really) unavailable because they are working on a crafting project for you. You can see the crew required to fly the fleet at the top right of your screen, alongside the total amount of crew available at the Starbase.
If everything is in order, you can edit the name in the top left corner or use the generated one. Click Form New Fleet to make it official!
Holosim – Hangar – Fleet View
Fleet Hangar Actions
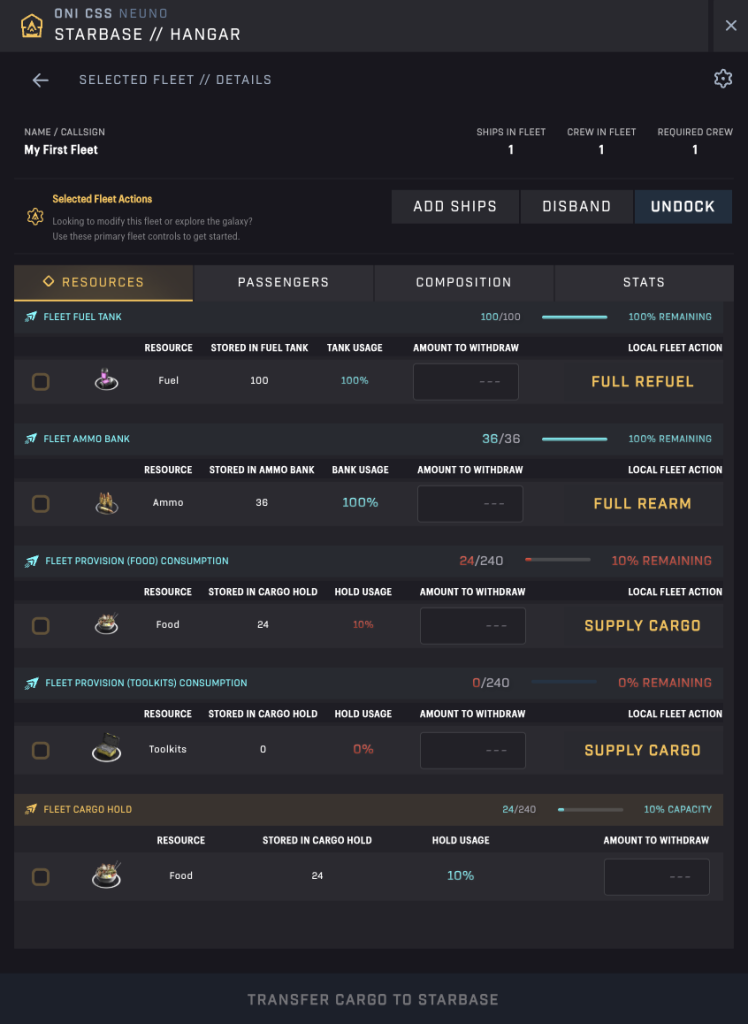
If you click a fleet in the Hangar, the above screen will appear (though it will be smaller with scrollbars).
Here you can add ships to the fleet, disband the fleet (returning all cargo, fuel, ammo, and crew members safely to the Starbase), or undock it. Furthermore, you can choose to refuel, rearm, and supply Food or Toolkits (cargo). Lastly, you will see a list of other cargo items at the bottom, which you can select and transfer to the Starbase with the button at the bottom of the panel.
Note: The input boxes to the right of every item are connected to the button at the bottom of the panel, not to the buttons to their right (which can be confusing). In other words, these are meant to extract resources from the fleet. Simply click the buttons to the right to add resources to the fleet.
Hangar Automation
In Holosim, whenever a fleet docks, some of the most frequently used actions are automatically taken care of. By default, your fleets will always:
- Fully refuel
- Fully rearm
- Unload all cargo at the Starbase
- Load up on some Food (needed for mining and scanning)
You can view and change these settings on a per-fleet basis by selecting it in the Hangar and then clicking the cogwheel in the top right of the dialog.

Holosim – Hangar Automation Controls
Here you can set the percentage of the cargo space that is filled with food (10% is a good start). You can also adjust this setting to determine whether the other actions should take place automatically or not. You can apply this setting to each of your fleets, and the instructions will be applied no matter where those fleets dock in the future.
7. Fleet Actions
There are two ways to select one of your fleets:
- You can click a sector and select your fleet in the list in the sidebar
- You can open My Fleets and select the fleet there
After you select your fleet, a list of actions will appear at the bottom right of your screen. Depending on the state of your fleet, the actions shown will differ.
Star System Sector – Undocked
If you are in a sector with a Star System (and Starbase), you’ll see the bar below:

Holosim – Fleet Actions – Star System Sector: Undocked
From left to right, these are the actions available:
- Dock — Dock with the Starbase present. This will change the composition of this fleet’s Action Bar to the Docked variant below. More importantly, it will make the fleet available in the Starbase’s Hangar.
- Warp — Warp to a location in warp range. This is the fastest mode of travel, using the most fuel per sector moved.
- Subwarp — Subwarp to a location anywhere on the map. This is the slowest mode of travel, using the least fuel per sector moved.
- Start Mining — Since every Star System has mineable asteroids, click this to start mining them.
- Scan — Scan the area, potentially find SDUs.
- Reload Weapons — You can ignore this unless, for some reason, you are defending and your weapons are not reloading correctly (which should not happen).
- Self Destruct — Willingly destroy your fleet. A terrible idea, unless you are in the middle of nowhere without any fuel left.
Note that some actions will be grayed out if your fleet does not contain the requisite resources to perform them (Food, and potentially ammo to mine, or just Food to scan).
Star System Sector – Docked
If your fleet is docked at a Starbase, you’ll get access to some of the options available in a hangar.

Holosim – Fleet Actions – Star System Sector: Docked
From left to right, these are the actions available:
- Undock — Undock from the Starbase. This will change the composition of this fleet’s Action Bar to the Docked variant above.
- Repair — Use Toolkits to repair the fleet
- Disband — Disband the fleet. This returns the ships, crew, and all resources and cargo to the Starbase.
- Reload Weapons — See above.
- Self Destruct — See above
Others Variants
If you are not in a sector with a Star System, your Action Bar will look like this:

Holosim – Fleet Actions – Any Other Sector
If you are mining, your Action Bar will shrink to just these options. The difference is that the first button now reads Stop Mining, and it will allow you to do just that.

Holosim – Fleet Actions – Mining
You will see custom actions when a fleet has been destroyed (see the chapter on Destroyed Fleets, below).
Movement
There are two modes of travel in Holosim: Warp and Subwarp. Both will get your fleet where you want it to go, but these options function radically differently, as each comes with different pros and cons.
Subwarp
Subwarping moves the fleet to the destination you select, one sector at a time. Every sector you move through will cost you some Fuel. You will be able to select any sector on the map and get a Fuel and Time projection. Make sure to bring enough Fuel for the return trip as well!
Holosim – Subwarping
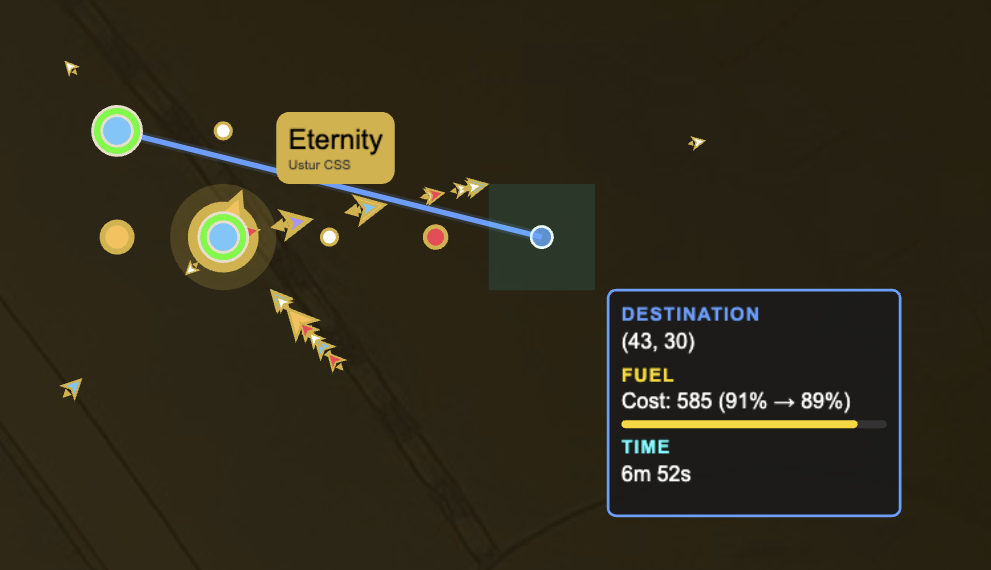
Click the Subwarp button and select a sector on the map. You will see a blue line appear that visualizes the flight path. At the end, you will see a popup displaying the coordinates of the target location, the cost of fuel required to reach it, the amount of fuel remaining after the movement is completed, and the time it will take to arrive.
Holosim – A Subwarping Fleet
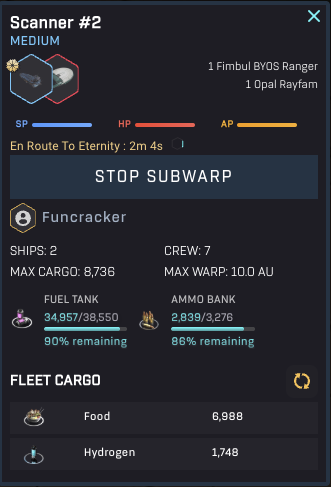
Click the Start Subwarp button to confirm the flight plan. After you have done so, you will see the fleet details in the upper left corner change. It now displays the destination and the remaining time, in addition to a “Stop Subwarp” button.
The Stop Subwarp button allows you to force the fleet to halt its movement. The fleet will abort its movement and remain in the sector it was in at the time.
Subwarp Speed — The speed at which your fleet subwarps will be equal to the subwarp speed of the slowest ship in your fleet. This is important to consider when creating your fleet.
Warp
The alternative to subwarp is Warp. It is much faster than subwarp but also more costly. Furthermore, the distance you can warp is not limited just by the fuel you have. Each ship has a maximum warp distance, which means that you may have to warp multiple times to reach your destination.
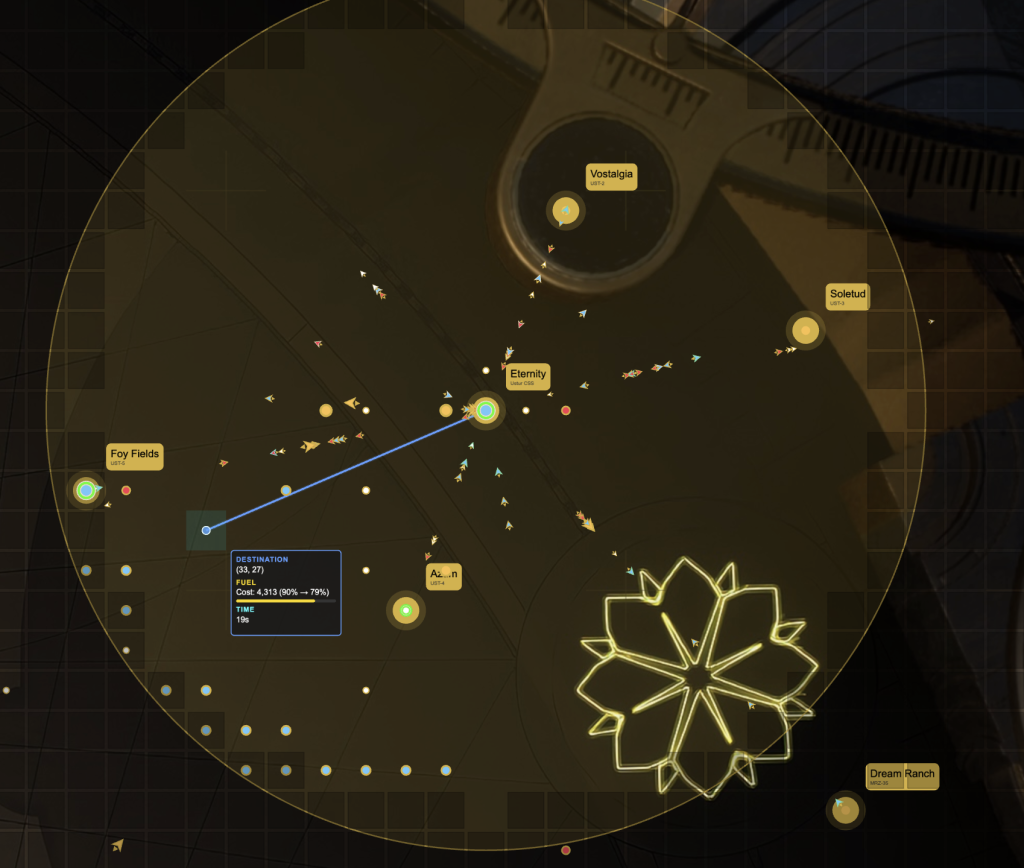
Holosim – Warping
Initiating a Warp is much like Subwarping, except that the interface will block sectors you can not reach due to your fleet’s warp distance limitation. Click the Warp button and select a sector that is within the maximum warp distance. You will see the blue line and the popup with details like before. Note that the Fuel cost per sector has increased, while the estimated time has decreased.
Cooldown — Though warp is very fast, it comes with a cooldown. After every warp, your fleet will have to wait a bit before it can perform its next warp. Your cooldown will start immediately after the fleet has arrived.
Warp Speed — Contrary to subwarp, the warp speed of your fleet is equal to the warp speed of the fastest ship in your fleet. The idea here is that this ship creates a bubble that encapsulates the other ships in its vicinity. In a similar vein, the maximum warp distance of the fleet is equal to the maximum maximum warp distance of any ship in the fleet.
8. Crafting
Crafting is one of the most important aspects of the game. You’ll need ingredients, crew, time, and possible permits to do so, and you’ll need to make sure these are available at the starbase you wish to craft at.
To craft, click the Crafting button in the Starbase Controls (for the Starbase), which will open up the following panel:
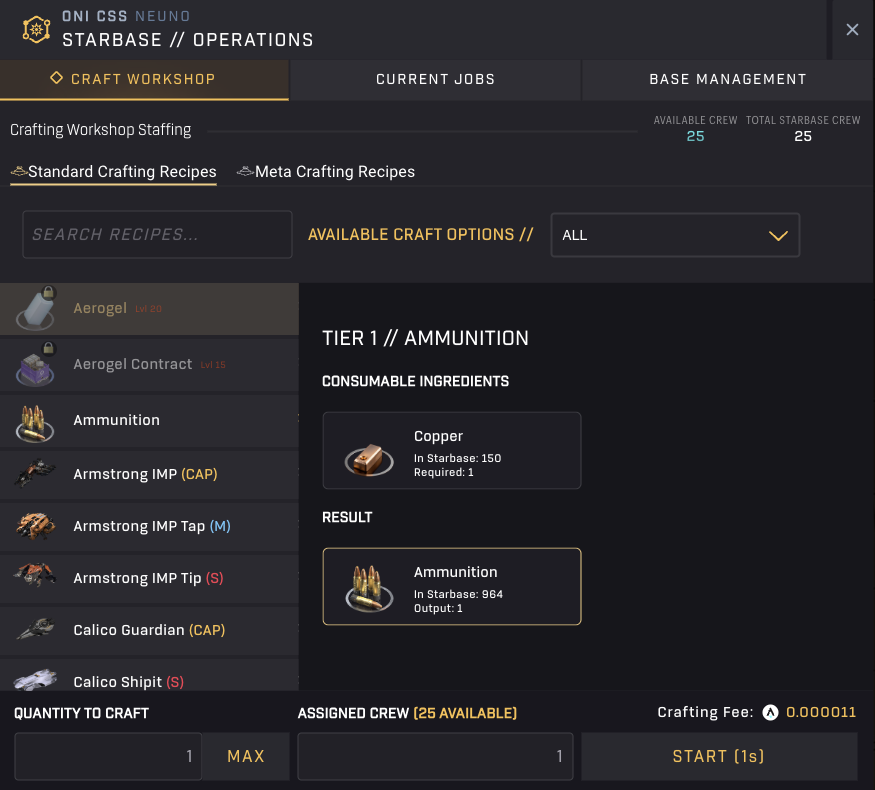
Holosim – Crafting Workshop
Clicking on a recipe on the left-hand side will display the required inputs to craft that specific item. You will also see the Crafting Fee required per item crafted in the lower right corner.
Select a recipe on the left-hand side, specify the number of assets you want created, add crew to work on it, and hit the Start button.
The Start button will become enabled when you select a recipe for which you have the required input ingredients and all other necessary requirements (at least one available crew member and sufficient zATLAS to cover the fee). More importantly, it will show you the time it will take to finish the crafting job.
By increasing the quantity of items to craft, the time required for this job will increase. You can bring it down again by adding more crew to the task. You can add as many crew members as are available, but note that adding more crew members than the quantity you are crafting does not speed things up any further. Crew members are not able to collaborate on a single item. In other words, if you want to craft a single item, having one crew member or 100 is not going to make a difference. Similarly, if you want to craft 50 items, then going from 49 to 50 will increase the speed, but going from 50 to 51 will have no effect.
Of course, not only does the completion time go up when you increase the quantity, but also the crafting fee. Both time and fee scale linearly with the quantity crafted, so there is no specific optimal amount to look for.
When you are satisfied, feel free to hit the Start button!
Managing Crafting Jobs
Once you are crafting something, you can switch to the second tab (Current Jobs) to see the progress. Later on, when a job is done, you will have to return here to complete the job and receive the output in your Starbase’s inventory.
This is also where you can choose to cancel the job. Cancelling the job will refund all input materials and the zATLAS fee. Note that there is no way to get it to complete some, but not all. Even if you cancel at the last second, all of your input will be returned to you.
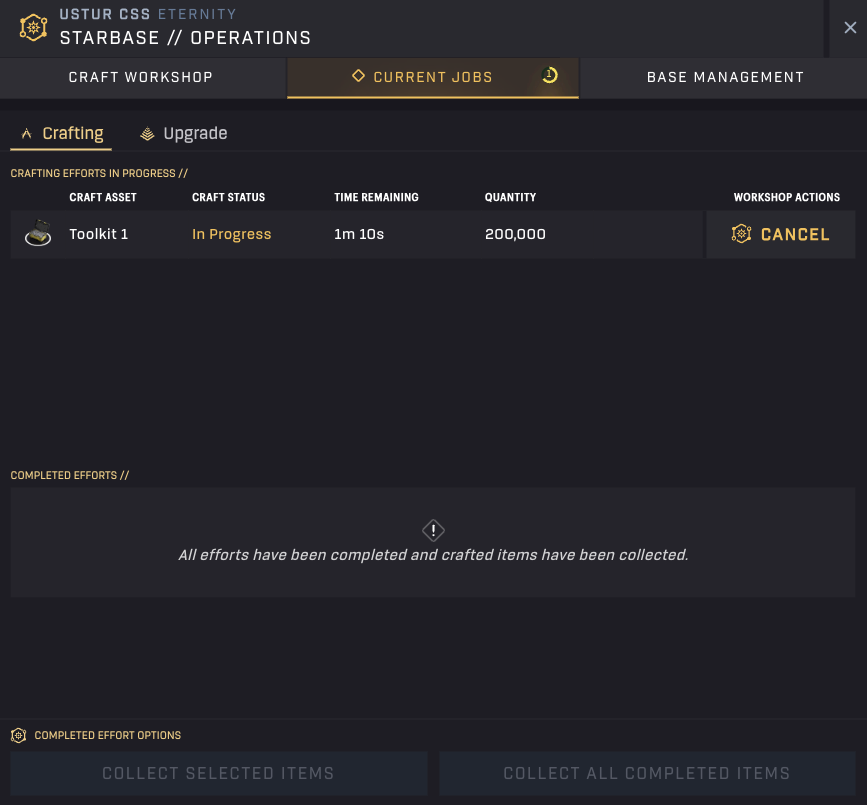
Holosim – Crafting Jobs
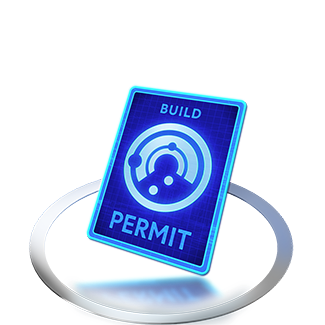
Build Permits
In Season 1 (and likely later seasons), the game is restricting what ship models you can build, and how many. You won’t see this for the starter ships, but bigger ships oftentimes need Build Permits as part of the crafting ingredients. The bigger the ship, the more permits you need. And they need to be of the right type as well. The game has:
- Mining Permits
- Combat Permits
- Scanning Permits
- Merchant Permits
You can earn permits by completing more advanced quests. Especially the Expertise quests tend to reward related Build Permits.
Another way to obtain these is through the Marketplaces, as players often sell the permits they no longer need.
9. Mining
Mining is pretty self-explanatory, so we won’t spend much time going into it. To mine Asteroid Belts within a Star System, your fleets require Food and Ammunition. That is, unless you are using Miner ships!
Miner Ships
Among all the ships you can craft in-game, there are fewer than a handful of mining-specialized ships. These all come from the same manufacturer, Armstrong. The largest of these is the Armstrong IMP (capital). The smallest one is the IMP Tip (small), with the IMP Tap (medium) sitting in between.
These ships are the only ones that do not consume Ammunition when mining. That is because they are equipped with the right equipment, such as rock grinders. All other ships use their weapons to blow off chunks of rock from the asteroid and collect that instead.
Besides not needing Ammo to function, these ships also have the best mining rate in their (size) class, meaning they mine the fastest!
10. Scanning
Scanning is an interesting affair in Holosim. Unlike Mining, it can not be automated. Yet, it would greatly benefit from automation, as it currently requires a lot of manual clicks.
Successful scans in Starbased result in the creation of a number of Survey Data Units (SDUs). These serve one primary purpose in the game: As input for specific recipes (including Data Contracts).
You can send a fleet to any sector and hit the scan button to perform a scan. If you have toaster notifications enabled (Settings -> Toast Notifications Enabled), you will see the result, which will be either a success or a failure. If it is a failure, you will see the percentage chance you have of finding SDUs. The chance also determines the number of SDUs you will find there upon a successful scan. You can use the following formula: SDUs found ~= chance x 71. Example: a 5.2% chance will yield ~369 SDUs if successful.
Note that, generally speaking, the odds of finding SDUs tend to improve the closer you get to the center of the map. This also increases the exposure and risk of your scanning fleets, however.
Data Runners
Similar to mining, there are dedicated ships that excel in scanning: Data Runners. There are only three such ships in existence today (as with mining): the Opal Rayfam (small), VZUS opod (medium), and the Fimbul BYOS Ranger (medium).
Data Runners, contrary to all other ships, require no Food to perform a scan. In addition, these ships have the best SDU/scan metric in their respective (size) class. Even their Scan Cooldown tends to be relatively good, though it may not be the very best.
In short, on paper, these are by far the best ships for the job. Even though Food consumption is not that big of a draw on your bottom line, not having to pay anything is always better!
11. Your Session
One cool thing about Holosim is that you can just pick a name and faction, and then jump straight into the game. No need to verify an email or choose a password. The game accomplishes this by simply creating a new session for you when you enter the game for the first time, and storing its identifier (think of this as a complex password) in your browser’s storage.
However, this has a big downside! It means that your game only exists within that one browser. If you clear its storage, you will remove the unique session identifier stored there, which will lock you out of your own game, forcing you to start anew.
Let’s make sure that doesn’t happen! And also, explain how you can play the same account from multiple browsers and/or devices.
Securing Your Session
Note that a tutorial quest is available to guide you through this process, but we wanted to highlight this crucial component of the game here as well.
Click the cog (Settings) button on the right-hand side of the Header Bar. You’ll see a list of options, including Save Game. Unfortunately, this button does not really accurately describe its function, as it does not save anything. But it does allow you to save your game! Click it to copy your session’s password to your clipboard. Then make sure to paste it again in a secure note, password manager, or text document (if there is no safe alternative).
For those wondering, yes, it is indeed a sequence of numbers.
Restoring Your Session
If you ever get locked out, or if you want to be able to game from a different browser or device, enter the game anew, and then as soon as you can (after choosing a name and faction), click the Settings button (cog) in the Header Bar and choose Restore Game. It will (directly underneath) spawn a text input box, where you can paste the full text you stored previously. Hit Enter (if necessary) to reset the game and reload it with your actual account.
12. 24/7 Online
Holosim is an MMO in the sense that the galaxy is live 24/7 and can accommodate thousands of players simultaneously, all playing in the same instance of the game. Even when you are not playing, your ships keep moving, your crafters keep crafting, and the game just goes on with everybody else.
This has consequences! If your fleets are not in a Starbase before you log off, they could be attacked by members of other factions. (Sub)Warping a fleet to a Starbase is not enough; you need to actually dock them to make sure they can not be destroyed while you are not playing.
As mentioned, your fleets keep moving when you are not behind your keyboard, and your crafters keep crafting. It’s a smart idea to use at least the latter by starting a bunch of slow crafting processes overnight, to be done by morning.
Tip: Before you head to bed, put on some crafting jobs lasting ~8 hours, so you can start the new day strong!
13. Automation
It’s nice that fleets keep warping and crews continue crafting when you’re not there. However, the game also offers additional ways to enhance your life by introducing idle gaming mechanics once you have leveled up.
Starting from level 5, you can automate your fleets to mine a specific resource from a specific location, or freight a resource between two locations. This is a huge timesaver as you’ll likely steadily introduce more mining fleets over time to keep your operations going, produce additional ships, and complete the season’s goals.
Now, there is a big caveat here: This automation will only run while your browser window is active. This is unlike fleet movement and crafting jobs, which will continue whether you are online or not.
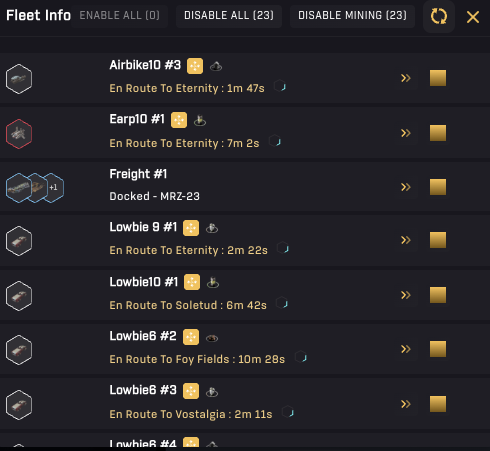
Holosim – My Fleets
Open up My Fleets via the Navigation Bar at the bottom. To the right of every fleet, there is a yellow/golden button, which will bring you to that fleet’s Automation interface.
Click on the box, then click “Enable Route”. Then select action type (mining, transport, or patrol).
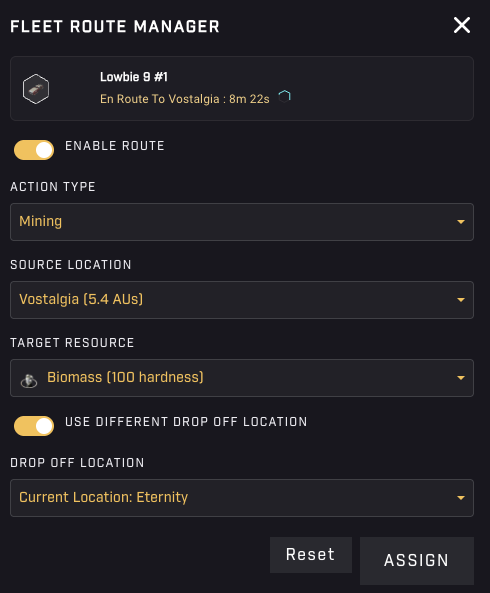
Holosim – Fleet Route Manager (Automation) – Mining
Mining
Choose Mining when you want to instruct a fleet to mine a specific resource, at a specific location, for as long as possible. This is likely the first automation you will want to set up for your fleets, as mining manually is quite tedious to keep up.
When choosing Mining, you’ll need to:
- Select the Source location — where to go and mine.
- Select the Target resource — what resource to mine at the source location.
- Toggle whether you want to use a different drop-off location — if not toggled, the fleet will deliver the mined resources at the Starbase in the Source location.
- Select the Drop-off location (if toggled) — where to unload the mined resources (e.g., the Central Space Station)
Fleets will always resupply at the drop-off location, meaning that as long as the drop-off has sufficient fuel and ammunition (if your fleet requires this), it will continue mining.
You may be tempted to send out all of your (future) mining fleets everywhere and instruct them to drop their resources off at the Central Space Station. This can be handy at the start, but you’ll likely find that using a mix of local mining with transports will result in better overall performance (resources mined / hour) later on.
Note: If you automate mining, this will override the Hangar Automations (see Hangar chapter) for that fleet regarding the amount of Food it will resupply. Instead of using the listed percentage, it will actually calculate what is required and use that instead.
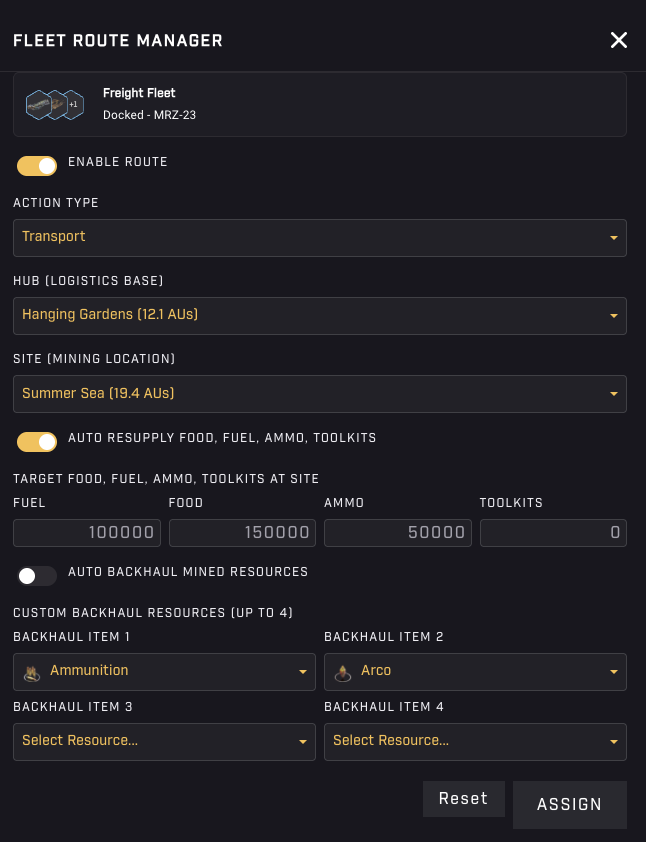
Holosim – Fleet Route Manager (Automation) – Transport
Transport
Once you are ready to level up your game, you will want to automate freight by setting up transportation routes.
When choosing Transport, you have a lot of options! This option initially assumes you have a fleet mining and depositing the resources at either the local Starbase or a nearby one that is not your primary hub. You will want to move those mined resources back to (one of your) hub(s) (most likely the Central Space Station at the start) while replenishing the core necessities, such as Fuel, Ammo, and Food, while you are on your way over there.
As such, you can decide to (by toggling the switch):
- Auto resupply Fuel, Food, Ammo, and Toolkits up to a certain level (at the target Starbase), or
- Select up to 4 assets you want to ship there from your hub.
You can then decide if you want to (by toggling the switch):
- Auto backhaul mined resources, which, as the name implies, will be auto-detected, or
- Custom backhaul up to 4 selected assets.
Knowing your options, you will also have to:
- Select the Hub location — where it will deliver the goods the fleet is about to pick up, and from where it will pick up the Fuel, Food, etc, or the asset you selected
- Select the Site location — where it picks up the mined cargo (automatically), or the backhaul items you selected
Note: Your fleet only refuels at the designated Hub location. Ensure you have fuel available to prevent getting stranded.
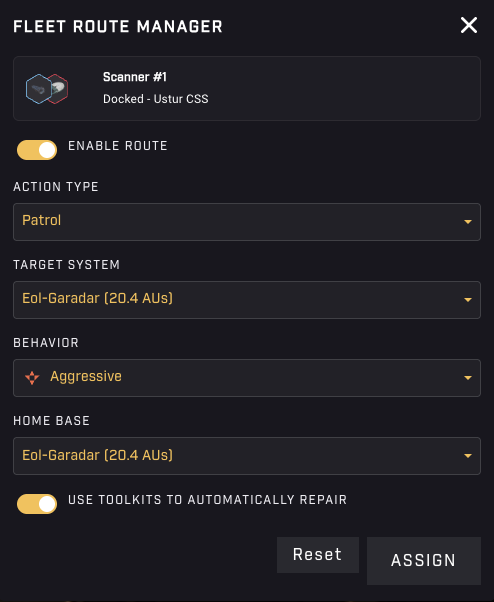
Holosim – Fleet Route Manager (Automation) – Patrol
Patrol
Lastly, a bit more experimental, there is the patrol option. You can set patrol routes for fleets, having them move between two Star systems, or linger around at one.
When choosing Patrol, you’ll need to:
- Select the Target system — where it will move to. This is one endpoint of the patrol route
- Select the Behavior — choose between two options: Aggressive (fleet will engage any enemy that enters range), and Strategic (fleet only engages enemies within range it can survive).
- Select the Home base — where it will start from. This is the other endpoint of the patrol route. If it is the same as the Target system, the fleet will just protect that one system and not move unless it sees enemy fleets.
- Toggle whether you want to automatically repair the ship at either location when toolkits are available.
Toggling Automation
After you set up the Automation and click Assign, you will see your list of fleets again, and you may notice a small square button (toggle) directly behind the fleet’s name. This button lets you easily enable and disable the automation you just created. It will be gold for mining, cyan for transport, and red for patrol when activated. Simply click it to turn it gray, deactivating the automation. Click it again to turn it back on.
14. Combat
At some point, the Quests will direct you to attack another player’s fleets. Whether you like to engage in combat or not, you’ll have to if you want to continue your progress in-game.
Tip: Try to create a fleet containing combat-oriented ships only. Mining ships, freighters, and data runners are not ideal to take with you if attacking is your goal.
Depending on the Season, you’ll likely only be able to attack fleets from the other two factions (meaning, everyone not in your faction). This means you’ll (most likely) have to venture out quite a bit before you can engage someone.
You can only attack and be attacked when you are in the same sector as a hostile fleet. When you want to attack, select your fleet (or at least the sector it is in) and hit the Command button at the bottom of the Sidebar.
This shows a list of all fleets present in a sector. When present, to the left, there are your fleets, in green, and allied fleets, in blue. To the right, there are enemy fleets (when present), in red, plus any dropped loot from (earlier) combat.
You can select your fleets by clicking on them, which will visually highlight them. Clicking a selected fleet again will unselect it.
Once your fleets are selected, there are three possible actions to choose from on the bar at the top of the panel: Repair, Attack, and Loot. All three of these actions function similarly: you first select your fleet(s), then click the right button, and then select your target.
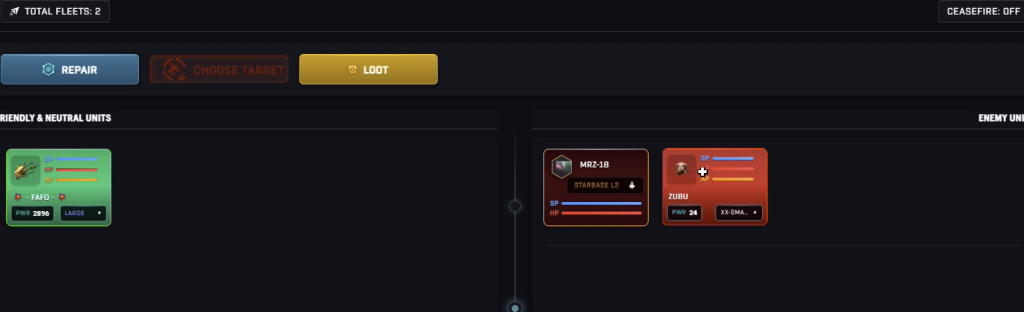
Holosim – The Fleet on the left is about to attack the fleet on the left
Attacking
To engage in combat, you start by selecting your fleets. You can click multiple fleets to select multiple, which you should (almost) always do! Unless you know what you are doing, you do not want to attack with your fleets one by one if they are in the same sector!
Next, you click the Attack button, and then select a single enemy target on the right-hand side of the panel.
The fleets you selected will fire, and at the same time, your target, the defender, will fire back at one of your fleets. In other words, only one fleet will receive damage in return. This means that using more than one fleet to attack may (considerably) increase your odds of survival, and therefore victory!
Note that both fleets attack each other simultaneously. Just because you take the action does not mean that the other fleet will just sit around and take it. Every fleet automatically defends itself, whether its own is online and playing or not.
Reloading & Repeat
One attack may not destroy your target, so prepare to repeat this a few times. However, you will first have to wait for the fleet’s ammo reload process to complete.
After shots are fired, fleets start to reload. As long as there is ammo in the ammo bay, the reload will succeed. Note that bringing extra ammo in the cargo bay is useless, as that won’t be used here. Reloading takes a different amount of time depending on your fleet’s composition, which marks another highly important area to consider when composing your fleet(s) for combat.
After fleets finish reloading, they can attack again if they survived the ordeal. Note that the fleets you selected for the attack may have different reload times, forcing you to wait until the last one is done. If you are in a hurry, you may want to consider deselecting the slow reloaders and performing an intermediate attack with the fleets that reload faster.
It goes without saying that you should be paying close attention to the Hit Points (HP) and Shield Points (SP) of fleets on both sides, to make sure you maximize your odds of survival. If a fleet on your side is heavily damaged, and another hit may take it out, you could consider unselecting that fleet for the next attack to ensure you come out with all fleets still flying.
Loot
Destroyed fleets will drop loot. The player who delivers the killing shot will have 20 minutes to loot their target’s remains before other players are allowed to do so as well. The loot will be based on the cargo contents of the fleet you blew up.
To collect loot, select one of your fleets, click on loot, and then click on the target loot box. Note that your fleet needs enough available cargo space to loot the remains, as they are stored in your cargo bay. If this is not the case, you will get as much as fits, and the rest is lost.
Fleeing
If you find yourself on the opposite end of the stick, you will not know unless you happen to have the fleet selected and see its HP levels plummet.
There is no time to waste! If your fleet is at a Starbase, dock it! Otherwise, if you can, warp the fleet out of there asap (as far away as possible)! Fleets can not be attacked while warping, and there is no reason to stay there.
If your warp drive is spinning down, then you may have to rely on subwarping as a last resort. The tricky thing is that you can be attacked up until the point where you exit the sector. This means it may be too late. The attackers may also follow you (warping) for a little bit, so this is far from a safe option. But if you have no other options, it’s better than sitting it out.
Repairs
The last button in this panel is to repair your fleets. It requires (at least) one of your fleets to have brought Toolkits along in its cargo bay.
Select this fleet, hit the Repair button, and select one of your other fleets that you wish to repair. Once repair starts, both fleets are free to perform other actions, and repairs will go on slowly until the target’s health is full (or toolkits run out).
Territorial Conquest – Flipping Starbases
Starbases can be attacked as well, and like fleets, they have hitpoints (HP) and a shield (SP). When a fleet brings a Starbase’s hitpoints down to 0, it will change hands to the faction that struck the killing blow (it will not be destroyed). This distinction is only relevant in the unlikely case there are fleets from multiple factions attacking the Starbase.
When a Starbase changes hands this way, everything inside the Starbase (ships, fleets, resources, and crew) will be locked. These are deemed prisoners of war. Reclaiming the Starbase at a later date will unlock and free all of these assets again (and likely now lock those of the occupier).
15. Destroyed Fleets
One day, you will wake up (or just return to Holosim), open your My Fleets list, and notice that one (or more, if you are unlucky) of your fleets has been (all but) destroyed. You will know this because in red, that fleet’s activity will read “Rescue Underway”, followed by a timer that counts down.

Holosim – My Fleets – A fleet was destroyed
This indicates it was destroyed in the Medium Risk Zone, meaning it is not lost to you completely!
Your fleet has been rescued and is currently being towed (invisibly) to your Central Space Station. Depending on how far away it was at the time of destruction, this may take quite a while.
While this is happening, there is absolutely nothing you can do. However, if this is the first time this happens, you can take steps to prepare for what comes next by crafting Toolkits.
Toolkits
Repairs cost Toolkits. Interestingly, though understandably, unlike most critical gameplay options, there is no quest that explains this.
You’ve likely noticed that the Header Bar directly displays four important resources available at your CSS: Fuel, Ammunition, Food, and Toolkits. You needed the first three almost immediately and have likely been working hard to make sure you are not constantly running out of these. But you never needed Toolkits, so you likely have 0 of these.
Well, you’re going to need them now, so best get crafting!
Toolkits require Iron. If you happen to be out of this, you could always acquire some on the Marketplace. Alternatively, you can purchase the toolkits directly there if the price seems right.
Recovery & Repair
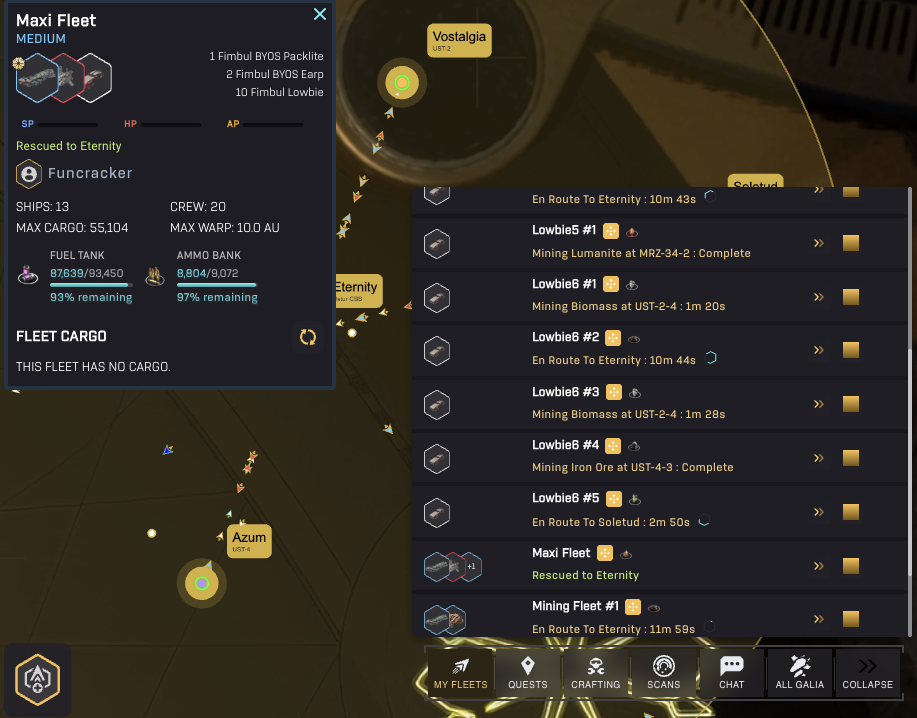
Star Atlas Holosim – Maxi Fleet was destroyed, but has been rescued!
When your fleet arrives at the CSS, its status will change to “Rescued to <name of your Faction’s home system>“. Selecting it will show only one Fleet Control option in the lower left corner: Recover Fleet.
There are two steps to getting back control over your fleet:
- Recover — Click the fleet in the list (notice it has no HP left) and then click the Recover Fleet button to recover your fleet. At this point, your crew members will be saved and added back into the “supply”.
- Repair — Next up, you will need to repair the ships that make up the fleet, which requires Toolkits. Ensure you have some on the Central Space Station (CSS) and click the Repair button to repair your fleet.
After you repair your fleet, it will be available again in your Hangar. If you had previously automated its actions, it will immediately return to doing what you told it to do before.
Tip: If the fleet was running an automated routine before, it will immediately resume after you repair it. This means it’s potentially moving back into harm’s way again. It’s likely smart to disable the automation briefly after repairs are done, until you have ensured there is no further danger.
17. Rewards
Season 1, Chapter 1, is all about faction-vs-faction competition through Contract redemption. There are various Contracts in-game that can be crafted and sold into a buy order set up by the team. Whenever you do, you help your faction one step closer to victory!
However, other than eternal glory, the winning faction will not earn any rewards just through that victory. To prevent everyone from mass-creating an account in every faction and playing a little, just to earn a reward, rewards are bound to individual performance. The higher you climb on the leaderboard, the better your odds of scoring a more valuable reward.
For Season 1, Chapter 1, the team has partnered up with Solflare Wallet. They have kindly donated $5k (in USDC) and 50 SOL for the competition. The team has added $30k in assets (VWAP prices) on top.
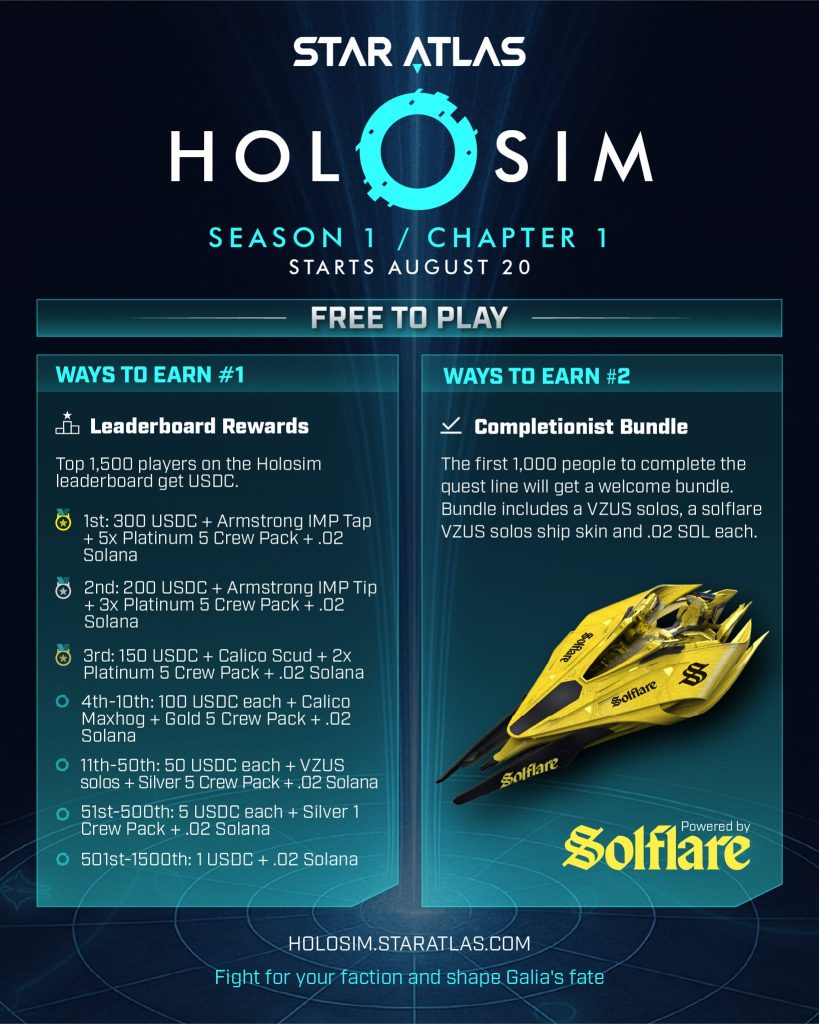
Holosim – Season 1 / Chapter 1 Rewards
18. Battle Pass
The team has integrated Stripe, offering a Battle Pass that can be purchased solely through it. As Holosim does not require a wallet to play (you do need to link one to get the rewards, however), the team has chosen not to allow cryptocurrency at the moment.
The Battle Pass costs $10 and will reward:
- Cosmetic rewards
- A bonus to the daily quest rewards
- You’re allowed a pass on the daily login streaks. You will not lose it if you miss a day.
19. Troubleshooting
Sometimes, for reasons that are unclear, your newly crafted ships (or even the ship you start the game with) do not show up in the Form New Fleet interface. If they do appear in your Inventory, then follow these steps to correct the situation:
Use the Starbase Controls to open your Inventory. You will note the ship you are missing is likely in the Starbase, but it is not available to form a fleet with. Select it, and hit the Export to Wallet button to temporarily remove it from the Starbase.

Holosim – Troubleshooting Missing Ships – Part 1
Next, click the Port button in the Starbase Controls, and you should see the ship now appear here (in the first tab – Wallet Inventory). Select it, and hit the Deposit to Starbase button at the bottom.
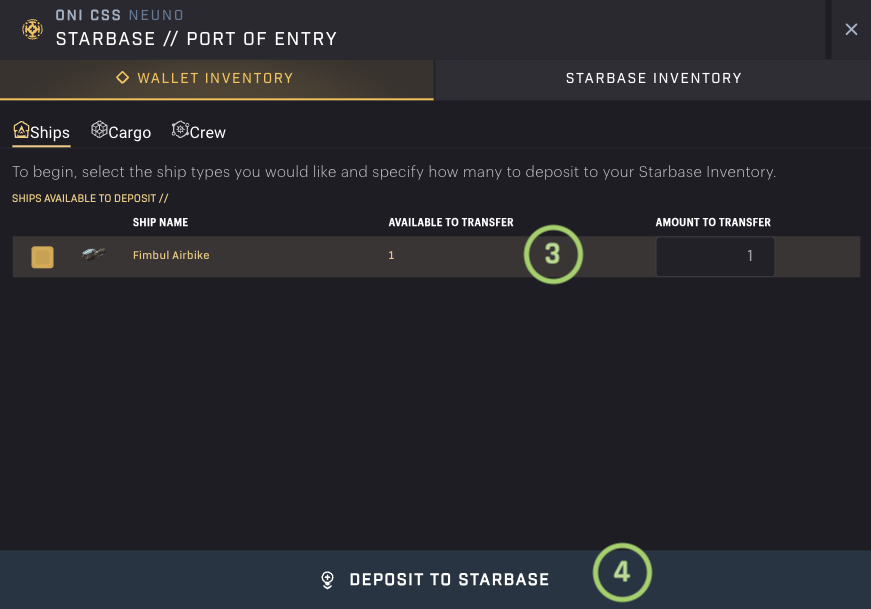
Holosim – Troubleshooting Missing Ships – Part 2
This should have resolved it. Please return to the Hangar and attempt to form the fleet again. If the problem persists, you may need to repeat this process.
If the ship does not appear in your Inventory either, you either:
- Did not finish the crafting job
- You are looking at the wrong Starbase
- You stumbled upon a more serious bug. Please report!