Welcome to Part 2 of our SAGE Labs: Starbased Manual! If you haven’t already, please check out the previous parts:
- Part 0: Intro – Introduction of Starbased, its place in the ecosystem, and the (mini-)game’s history.
- Part 1: Basics – Learn how to navigate the game’s interface, deposit your ships, create fleets, and move around the galaxy!
We expect you to have at least read Part 1 before continuing with this part. In this part, we’ll go over the following topics:
- Resources
- Richness
- Hardness
- Faction Crystals
- Mining
- Miner Ships
- Mining Rate
- Start Mining
- Stop Mining
- Scanning
- Survey Data Units
- Scanning Metrics
- Data Runners
- Information Density
- SDUs Found per Scan
- Start Scanning
- Stop Scanning
- Scanning Shortcut
- Crafting
- Crew Requirement
- Active Crew Count
- Crafting Recipe Tiers
- ATLAS Fee
- Start Crafting
- Manage Crafting Jobs
- Completing Crafting Jobs
- Ship Crafting
- Meta Crafting Station
1. Resources
Every Star system is home to an Asteroid belt in Starbased. This belt is where mining fleets can go to mine raw resources. This will be expanded upon in future versions of SAGE, but for now, this makes things relatively simple.
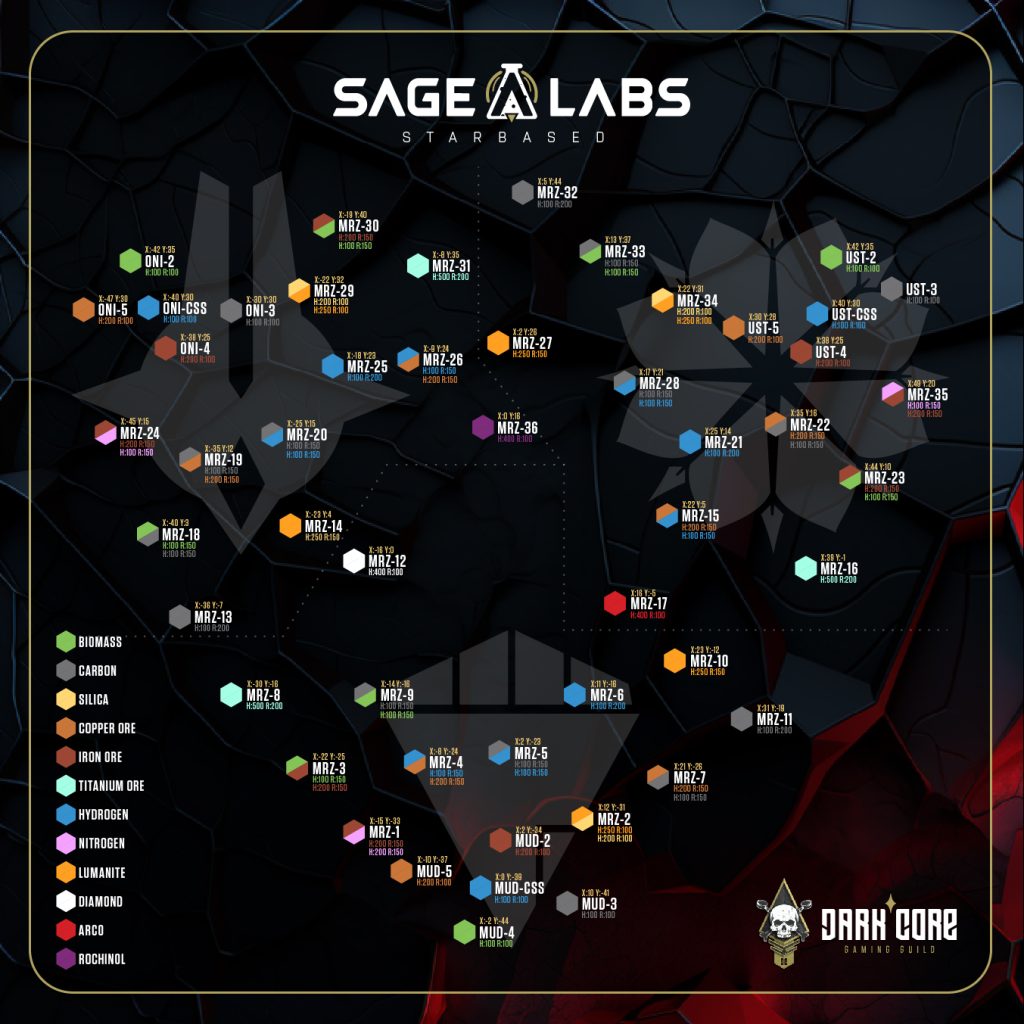
Starbased – Galia Expanse Resource Map [Courtesy of the Dark Core Roasters]
Every Asteroid belt offers different resources, meaning you may have to travel vast distances before you can mine the resources you want. Some belts even offer two different resources, which means you get to choose when you start your mining operations there.
There are two important resource-related stats that play a large role in your mining operations: richness and hardness.
Richness
Asteroids that are further away may offer a richer supply of the resource, expressed as richness.
In Starbased, the richness of a resource vein is expressed as a number, with its range being between 1 and 2 (often expressed as a range between 100 and 200 to prevent decimals). Most asteroids, especially closer to the Faction’s CSS, come with resource veins that have a richness of 1. Further away, asteroids that offer resource deposits with a richness of 1.5 or even 2 may be found.
Hardness
Another value of importance is a resource’s hardness. This number does not deviate between different asteroids but is fixed for a specific resource instead. It, too, has a range between 1 and 5 (often expressed as a range between 100 and 500 to prevent decimals).
| Resource | Hardness | Richness 100 | Richness 150 (MRZ-) | Richness 200 (MRZ-) |
|---|---|---|---|---|
| Biomass | 100 | MUD-4, ONI-2, UST-2 | 3, 9, 18, 23, 30, 33 | |
| Carbon | 100 | MUD-3, ONI-3, UST-3 | 5, 9, 18, 20, 22, 28 | 11, 13, 32 |
| Silica | 200 | MRZ-2, MRZ-29, MRZ-34 | ||
| Copper Ore | 200 | MUD-5, ONI-5, UST-5 | 4, 7, 15, 19, 22, 26 | |
| Iron Ore | 100 | MUD-2, ONI-4, UST-4 | 1, 3, 23, 24, 30, 35 | |
| Titanium Ore | 500 | 8, 16, 31 | ||
| Hydrogen | 100 | MUD-CSS, ONI-CSS, UST-CSS | 4, 5, 15, 20, 26, 28 | 6, 21, 25 |
| Nitrogen | 200 | 1, 24, 35 | ||
| Lumanite | 250 | MRZ-2, MRZ-29, MRZ-34 | 10, 14, 27 | |
| Diamond* | 400 | MRZ-12 | 12 | |
| Arco* | 400 | MRZ-17 | 17 | |
| Rochinol* | 400 | MRZ-36 | 36 |
Resource Hardness & Richness
Faction Crystals
The resources marked above with an asterisk (*) are so-called Faction Crystals. They are resources that can only be found in the domain of a single Faction, and they are all crystals. All crafting recipes out there that require such crystals currently work with all of them. This will change in the future, bringing some recipes out of (easy) reach for some Factions.
2. Mining
To mine Asteroid Belts within a Star System, you must create a fleet, load it with Food and (likely Ammo), and undock it. Then, if the Asteroid you want to visit is in the same system, you can start mining immediately. If not, then you will first have to move the fleet to the right system.
Note that you need Fuel in both cases, but of course, you need more of it when you need to go to another Star System. However, once in a sector with a Star system, the game requires 50 Fuel to approach the asteroids and start mining.
Miner Ships
Among all the ships the team (and marketplace) offer are less than a handful of mining specialized ships. These all come from the same manufacturer, Armstrong. The largest of these is the Armstrong IMP (capital). The smallest one is the IMP Tip (small), with the IMP Tap (medium) sitting in between.
These ships are the only ones that do not consume Ammunition when mining. That is because they are equipped with the right equipment, such as rock grinders. All other ships use their weapons to blow off chunks of rock from the asteroid and collect that instead.
Besides not needing Ammo to function, these ships also have the best mining rate in their (size) class!
| Ship | Size | Mining Rate (/s) | Food consumption/s |
|---|---|---|---|
| Armstrong IMP Tip | S | 6.207 | 0.043 |
| Armstrong IMP Tap | M | 19.192 | 0.072 |
| Armstrong IMP | Cap | 183.477 | 0.617 |
Starbased – Miner Ships
Mining Rate
We recommend keeping a close eye on the Ship Stats Spreadsheet (by the team), which contains all the relevant statistics for all the ships out there. For mining, there are three crucial metrics:
- Food/second (consumed during mining)
- Ammo/second (consumer during mining)
- Mining rate
You will note that there are jumps in numbers between ship (Size) Classes. Furthermore, you will see that the three IMP ships come with the best mining rate in their size class category and that they, indeed, consume no ammo.
The mining rate is important, as it determines how fast you will fill your cargo space with raw, mined resources. Note that this is the rate at which resources with a Hardness of 1 and a Richness of 1 are mined. Resources with double that Hardness will take twice as long to mine, which means your real mining rate will be cut in half. However, Richness has the opposite effect. It increases the mining rate
Here are some examples:
- Base mining rate (as per the spreadsheet): 4
- Mining rate of Hydrogen (hardness 1, richness 1): 4 hydrogen/second
- Mining rate of Hydrogen (hardness 1, richness 2): 8 hydrogen/second
- Mining rate of Silica (hardness 2, richness 1): 2 silica/second
- Mining rate of Diamonds (hardness 4, richness 1): 1 diamond/second
- Mining rate of Diamonds (hardness 4, richness 1.5): 1.5 diamond/second
Start Mining
Note: Before actually following the below steps, read through them to better understand how to prepare your fleet in advance.
Undock your fleet, and (optionally) move it to the Star System whose asteroid belt you want to mine. When there, select your fleet and select the Mining action in the Fleet’s Controls.
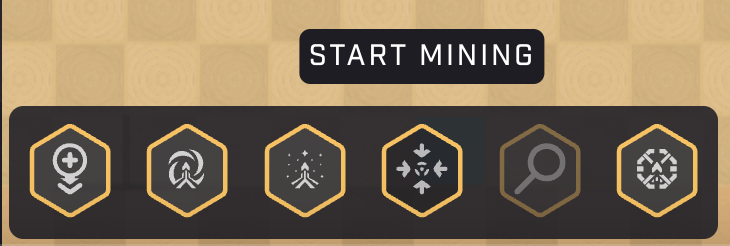
Starbased – Fleet Controls – Start Mining
A new dialog will pop up that allows you to start mining, but also provides a decent amount of useful information that you can use to better prepare your mining missions.
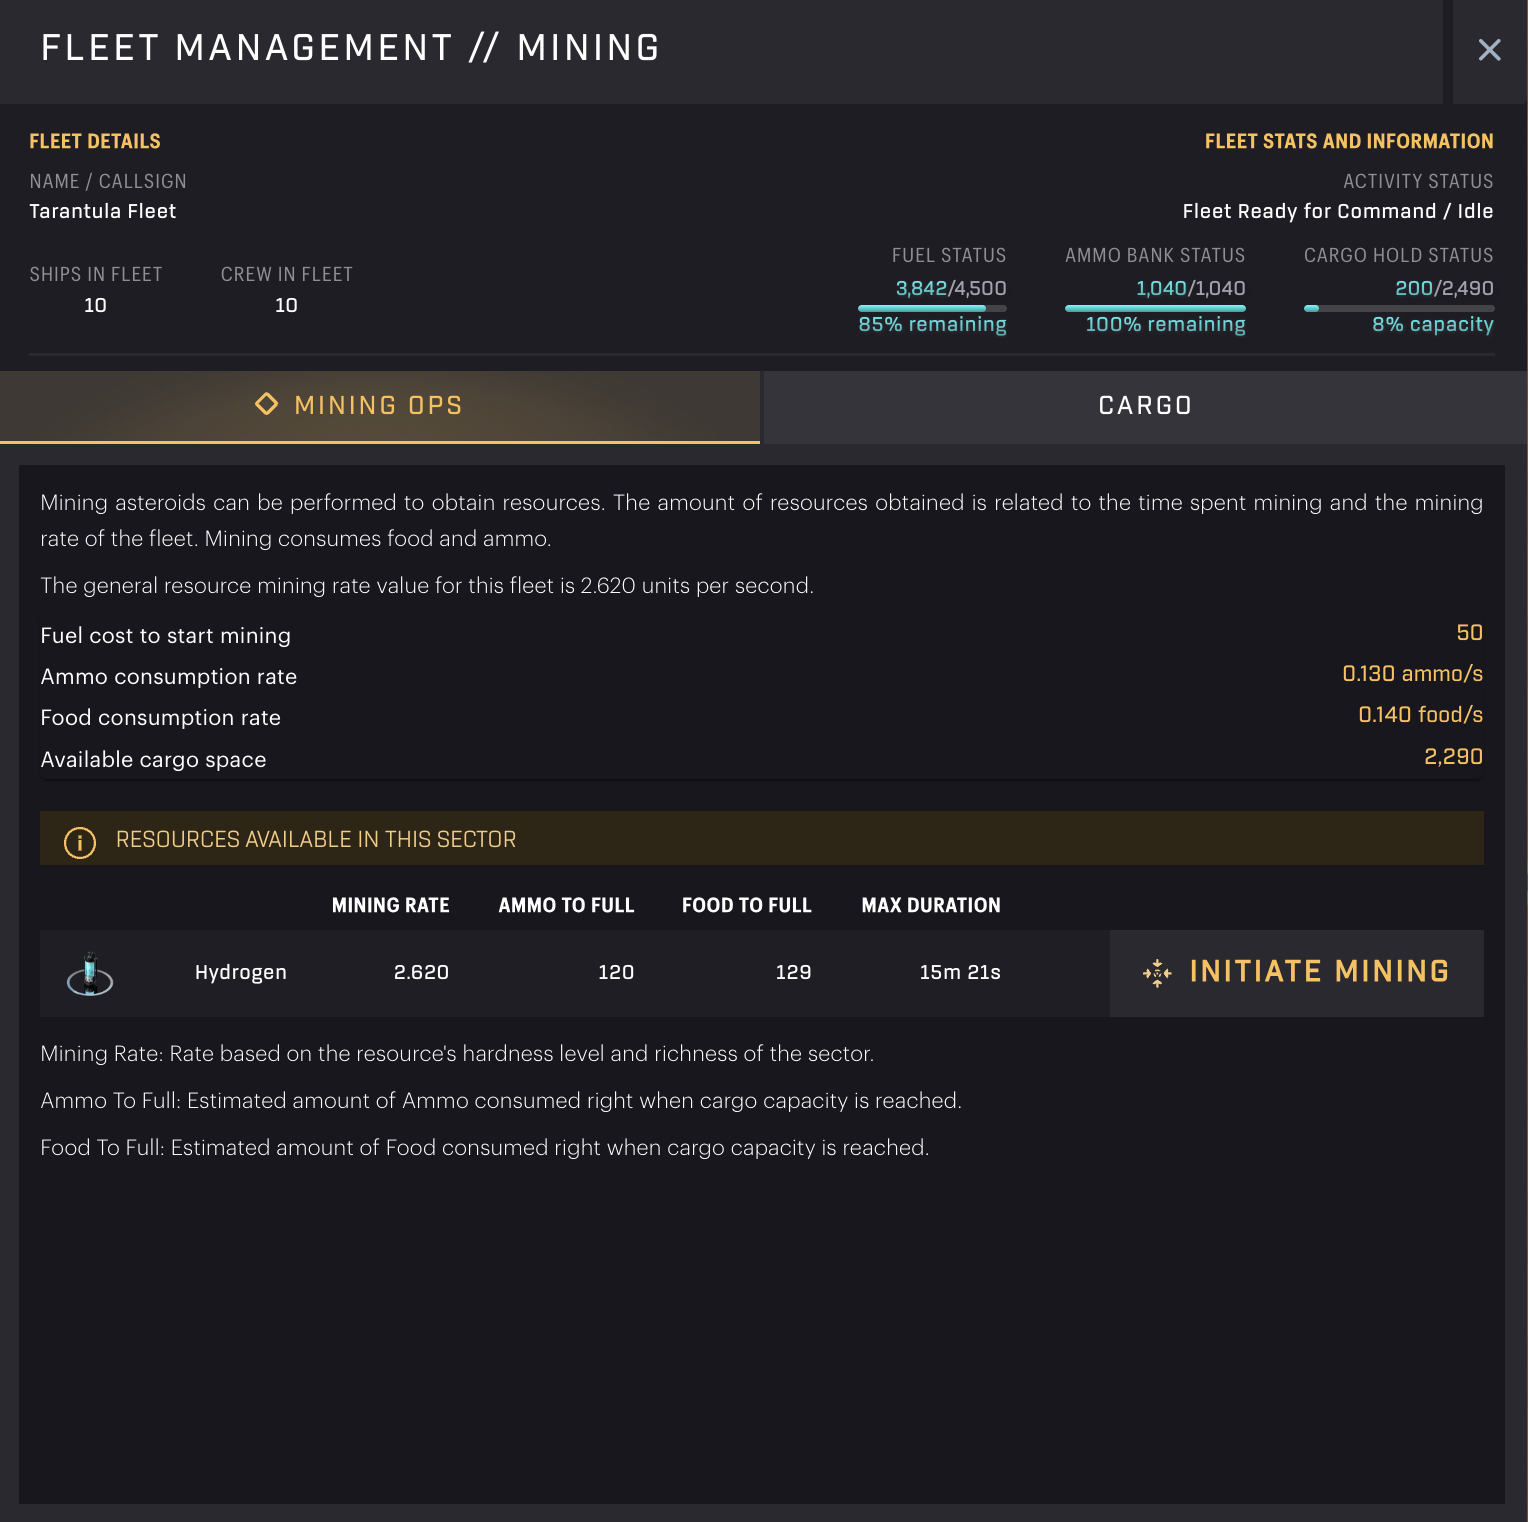
Starbased – Let’s go mining!
At the top of the Mining Ops tab, it shows the fleet’s Ammo & Food consumption per second and the total available (remaining) Cargo space. This is good info to have, but the next section shows even better information, as it uses these rates to calculate the amount of Ammo and Food needed to fill up your remaining Cargo space.
The Resources available in this sector section is where it’s at. It lists the resources available at this Asteroid Belt and shows for each:
- The amount of Food & Ammo you need to bring to fully fill up your remaining Cargo space.
- The actual mining rate (taking into account the mining rate of the ships in your fleet, plus the hardness of the resource & the richness of this particular vein)
- The amount of time required to mine this resource.
Note that this last one, the Max Duration, does not only take into account your available Cargo space. It also takes into account the amount of Ammo and Food your fleet brought along. As such, it is the actual time needed before the fleet can not mine anymore, either because its cargo is full or because it has run out of a required resource.
You can start mining by clicking the Initiate Mining button behind one of the resources. That is if you made sure the fleet brought some Ammo (if needed) and Food along. If you forgot this, the button will be disabled and show a warning instead.
Click the button to start mining and make sure to come back after the ma duration indicated.
This dialog also comes with a Cargo tab, which you can click to see what is in your Fleet’s cargo hold. It is not overly useful, but you can at least check your Cargo Hold to see when you could have been sure you brought along enough Food.
Stop Mining
While you are mining, you can keep an eye on your fleet using the Fleet Overview button in the top right corner. Once mining has come to a halt –you will be able to easily see when– (use the arrows to) jump to the fleet directly and instruct the fleet to stop mining.
Starbased – Fleet Overview button

Starbased – Mining paused because Food ran out (in this case)
Before you can do anything else, you will have to give the Fleet the command to Stop Mining. You will notice the Fleet Controls menu in the lower-left corner of the map only shows this one option. It won’t show the usual commands until you have clicked this first.
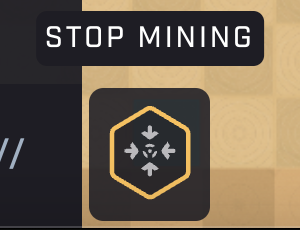
Starbased – Stop Mining
If the Fleet is in the same sector as the Starbase you want to offload your resources to (and potentially acquire new Food, Ammo, or Fuel, then you can use the Fleet Controls (after selecting the fleet in the left sidebar) to Dock. If you want to go elsewhere, first Subwarp/Warp the fleet into the right Star system and Dock it when it arrives.
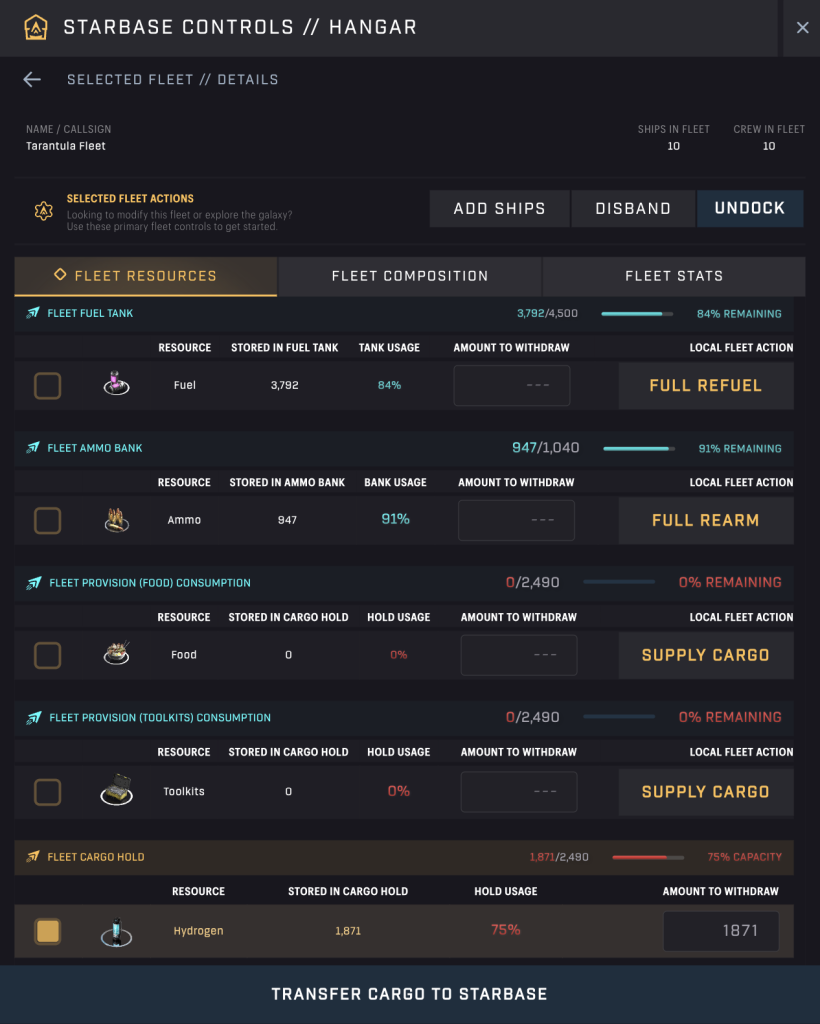
Starbased – Hangar – Transfer Cargo to Starbase
Unloading works through the Hangar dialog of the Starbase. Open it, select your fleet, and click the checkbox at the bottom of the dialog. The checkbox automatically adds the maximum resource to the input field, so you only have to hit the Transfer Cargo to Starbase button next.
Because this interface also allows you to restock the resources you need, you can get quickly going again!
Note: Just for this example, we brought a smaller amount of Food than would have been optimal. Your goal is usually to return to the Starbase with your Cargo holds fully filled with the resource you mined.
3. Scanning
Contrary to Mining, Scanning can be performed by a fleet in any map sector. However, roughly speaking, the probability of finding data (expressed as Survey Data Units, or SDUs) increases the further away from the CSS the fleet is and the closer it is to the center of the Galia Map.
Survey Data Units
Successful scans in Starbased result in the creation of a number of Survey Data Units (SDUs). These serve one primary purpose in the game: As input for one of the upgrade pipelines for a Starbase. Its only other purpose comes through some Meta Crafting Recipes (see the Crafting chapter).
Scanning Metrics
There are three stats in the official Ship Stats spreadsheet that play a role in scanning:
- SDU/Scan — The maximum number of SDUs retrieved by that ship on a successful scan. This number is added up for every ship in a fleet when it performs a scan.
- Food/Scan — This is the amount of Food consumed per scan, regardless of whether it was successful or not. This number is added up for every ship in a fleet when it performs a scan.
- Scan Cooldown — The time (expressed in seconds) you’ll have to wait before being able to perform another scan. The ship with the highest maximum cooldown determines the cooldown for the whole fleet.
Data Runners
Similar to mining, there are dedicated ships that excel in scanning: Data Runners. There are only three such ships in existence today (as with mining): the Opal Rayfam (small), VZUS opod (medium), and the Fimbul BYOS Ranger (medium).
Data Runners require no Food to perform a scan. In addition, these ships have the best SDU/scan metric in this respective (size) class. Even their Scan Cooldown tends to be relatively good, though it may not be the very best.
In short, on paper, these are by far the best ships for the job. Even though Food consumption is not that big of a draw on your bottom line, not having to pay anything is always better!
| Ship | Size | SDU/Scan | Cooldown |
|---|---|---|---|
| Opal Rayfam | S | 20.17 | 104s |
| VZUS opod | M | 63.06 | 100s |
| Fimbul BYOS Ranger | M | 63.06 | 100s |
Starbased – Data Runner Ships
Information Density
When you perform a scan, the on-chain program rolls some dice to determine if the scan is successful. Both the chance of you being successful and the number of SDUs found solely depend on a (hidden) key metric called Information Density.
Every sector has its own Information Density (ID) value, which is expressed as a percentage (between 0% and 100%). A sector’s maximum ID value changes slowly over time based on a (hidden) “noise” function and its distance from the center. Its actual value will reach this maximum if no fleet has successfully scanned there for quite some time. Every successful scan in that sector will diminish the ID there. This value slowly regenerates over time back up to its maximum value.
A sector’s ID affects two things:
- The chance of you finding any SDUs at all. The ID percentage represents your chance of performing a successful scan.
- The maximum amount of SDUs found upon a successful scan. The maximum amount of SDUs available in a sector equals the ID multiplied by 10. This means that an ID of 1% means there are 10 SDUs available, and 20% means there are 200.
Note: As the maximum value of the Information Density is 100%, the maximum amount of SDUs that can be retrieved in a single successful scan equals 1000. This may be more of a theoretical maximum, however, as ID values higher than 70% have not yet been witnessed.
SDUs Found per Scan
The information density of the sector you are scanning, combined with the SDU/scan value of your fleet, determines the actual number of SDUs found per successful scan. Let’s look at a few examples:
Example 1:
- SDU/Scan stat: 36
- Information Density: 10%
- Amount of SDUs found on a successful scan: 36
An ID of 10% means there are 100 SDUs available. This means that the SDU/Scan stat is the limiting factor here (which is the optimal scenario). The fleet will collect the maximum amount possible.
Example 2:
- SDU/Scan stat: 360
- Information Density: 10%
- Amount of SDUs found on a successful scan: 100
An ID of 10% means there are 100 SDUs available. Even though the SDU/Scan stat is now 360, there are no more than 100 SDUs available. The ID % is the limiting factor here, which is clearly not optimal. This demonstrates right away that creating a big scanning fleet that can collect a lot of SDUs per scan may not be the best strategy.
Start Scanning
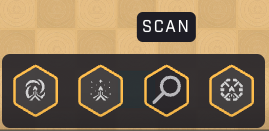
Fuel up your fleet, supply it with Food (if required), undock it, and (best) move it to a sector in the middle of nowhere, in the direction of the middle of the Map. When you arrive at a good-looking destination, select your fleet and select the Scan action in the Fleet’s Controls.
Starbased – Fleet Controls – Scan
Contrary to almost all other actions, there is no dialog popping up. Instead, you get to sign a Solana transaction straight away. Or, more precisely, you get two transactions to sign. The second is to perform the actual scanning, but if your fleets have never been here before, the first transaction is to register the sector with your account on-chain. The reason for this requirement is purely technical. It is a limitation of the current game in combination with Solana. Subsequent scans in this sector will only require one transaction.
Note that the Scan button has now been disabled for the duration of the fleet’s Scan Cooldown period. Unfortunately, it does not show a countdown (see Scanning Shortcut section below), but it will be enabled as soon as the Cooldown is over.
Soon (usually) after signing that transaction, you will see a temporary popup appear in the lower right corner of your screen. It will show a message such as below if your scan failed:
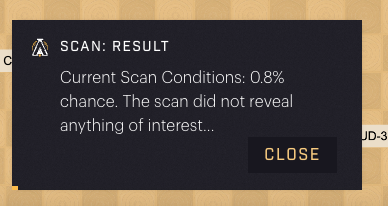
Starbased – Failed Scan
Besides the disappointing message, this popup provides crucial information that should help you determine whether it’s worth waiting (for the cooldown to finish) and trying again or moving the fleet to a sector where your odds may be better.
Note: Remember that when you would have been successful, a 0.8% chance means that you would have received up to 8 SDUs at most (possibly lower when your fleet has a lower SDU/scan).
If you are lucky, you will instead see a popup such as this one:
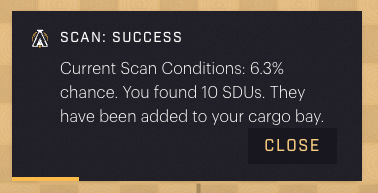
Starbased – Succesful Scan
The fleet we’ve been using throughout this guide as an example consists of 10 Fimbul Airibikes. Each has an SDU/scan stat is 1, meaning the fleet can find 10 SDUs/scan at best. That is the reason why, here, instead of finding 63 SDUs (the maximum possible on this sector, at the presented odds), this fleet found 10 SDUs.
Note: if you perform another Scan before the Cooldown is over (sometimes possible due to the UI not updating properly), you will get a similar message that tells you you had a 0.0% chance.
Stop Scanning
When you are done scanning, simply return your fleet to a Starbase to offload the SDUs found from your Cargo hold and (potentially) restock on Fuel and Food. Afterward, you can set out again to find more SDUs or perform another task.
Scanning Shortcut
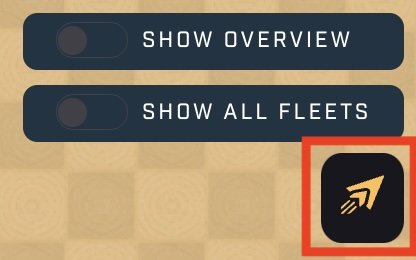
The above is all well and good when you have one or two fleets actively scanning. However, even then, there is an easier way that allows you to do other things as well.
This is where the Show Overview toggle in the upper-right corner of the map finally becomes useful! Click it to open a new panel at the bottom of the screen and select the Sector Survey tab. This panel won’t go anywhere until you disable the Overview using the same toggle.
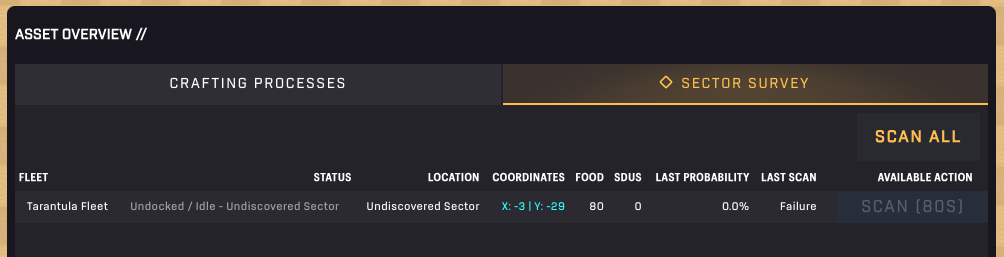
Starabased – Sector Survey
Here, you will see a list of all undocked and non-moving fleets—in other words, fleets that are ready to scan!
Behind every fleet, there is a Scan button that immediately triggers the Scan action for that fleet. As with the standard way to scan, when you trigger a Scan, this button will be disabled. However, this button shows an actual cooldown in seconds during that time, which makes it much easier to know when you have to get back into action!
This overview is really the best way to participate in Scanning in Starbased. It allows you to keep a close eye on your fleets and hit that Scan button for all of them as soon as they are ready to go at it again.
If you have many fleets with similar cooldown times, the Scan All button at the top right makes scanning even easier, requiring fewer clicks! However, note that you will have to sign a transaction for every fleet.
Note: Remember to use the Fleet Overview button (below the Show Overview toggle) to find all of your undocked fleets, including the ones moving.
4. Crafting
Mining resources is all good and well, but without refining them and combining those refined resources into more useful components, there is really no good use for them (besides selling). In Starbased, resource-related activities are bundled into a single discipline, crafting.
Crew Requirement
Contrary to Mining and Scanning, no fleets are required as crafting takes place on a Starbase. Instead, crew members are needed to carry out the crafting work. A lot of crew mans your ships, and, therefore, your ships represent the biggest source of crew available to you in-game. In fact, until the team launches their Crew NFTs, it is the only source of crew members.
When ships are present in a Starbase without being part of a fleet, you can use their crew members to help you craft. This means that after depositing ships to the CSS, you can immediately use the crew these ships come with to start crafting. Any fleets you have can be disbanded to make the ships available again. This allows you to create new fleets with these ships or use their crew for crafting.
To Disband a fleet: Dock it, go to the Starbase Hangar, select the fleet, and click the Disband button near the top.
While a ship’s crew is working on a crafting job, they can not man a ship. Though a ship’s crew is (at the moment) fully interchangeable, you will need to have a number of crew members available equal to that of the ship’s default crew if you want to add that ship to a new Fleet.
Active Crew Count
The Ship Stats spreadsheet we keep referring to also has an important column for crafting. It has nothing to do with speed or consumption, but instead, it shows the number of active crew members a ship has to help with crafting. This number sometimes deviates from the number listed on a ship’s details, which you can find on the Galactic Marketplace. The reason is that, until Crew NFT support arrives, the team has assigned some ships a bonus based on their spec. Specifically, transport-specced ships have been boosted in this way to give them a bonus while crew transportation is not yet available.
Note that you need to return all active crew members to a ship before it can join a fleet. It’s not possible to keep this small addition (passengers) on your Starbase while the ship is departing.
Crafting Recipe Tiers
There are a great number of items that can be crafted at the various Starbases. Most important are the various compounds and components required to upgrade Starbases. However, the availability of specific crafting recipes depends on the Tier of the Starbase. The higher the Tier, the more recipes will be available.
All crafting recipes are available at your Faction’s CSS, which counts as a Tier 6 Starbase. It is also the only location where Meta Crafting can take place (more on that later)
To make more crafting recipes available at a different Starbase, it will need to be upgraded to the next Tier.
Below, you can find the full overview of all Component/Compound Crafting Recipes and the Starbase Tier required to unlock them:
Tier 1:
- Copper
- Electronics (needed for Starbase upgrade to Tier 2-5)
- Food
- Framework 1 (needed for Starbase upgrade to Tier 2-5)
- Fuel
- Graphene
- Hydrocarbon
- Iron
- Polymer
- Power Source (needed for Starbase upgrade to Tier 2-5)
Tier 2:
- Ammunition
- Copper Wire
- Electromagnet (needed for Starbase upgrade to Tier 2-5)
- Magnet
- Toolkit 1
Tier 3:
- Aerogel
- Crystal Lattice 1
- Crystal Lattice 2
- Crystal Lattice 3
- Field Stabilizer (needed for Starbase upgrade to Tier 3-5)
- Framework 2
- Steel
- Toolkit 2
Tier 4:
- Energy Substrate
- Framework 3
- Radiation Absorber (needed for Starbase upgrade to Tier 4-5)
- Titanium
- Toolkit 3
Tier 5:
- Particle Accelerator (needed for Starbase upgrade to Tier 5)
- Strange Emitter
- Super Conductor
Other items can be crafted besides components and compounds, but only at the CSS, such as ships and meta-crafting items from third-party (external) projects. We’ll explore those in later sections of this chapter.
ATLAS Fee
You need the input materials, a Starbase of high enough Tier to have the recipe, and at least one available crew member before you can craft anything. But there is one more thing required: A small sum of ATLAS.
Every recipe comes with a small ATLAS fee. This Facility Access Fee flows to the DAO and represents 7% of the Marketplace price for the specific item, averaged over a 7-day period. Unfortunately, the fee does not auto-update regularly. Instead, the team updates it every now and then when the market prices for the output of various recipes have changed a lot.
Start Crafting
To get crafting, select a sector with a Starbase where you have crew (ships) available and select the Operations option at the top of the Starbase Controls. At the top of the dialog that pops up, click the Craft Workshop tab. This will right away bring you to the Standard Crafting Recipes sub-panel. On the left-hand side, you can view all the recipes this particular Starbase offers.
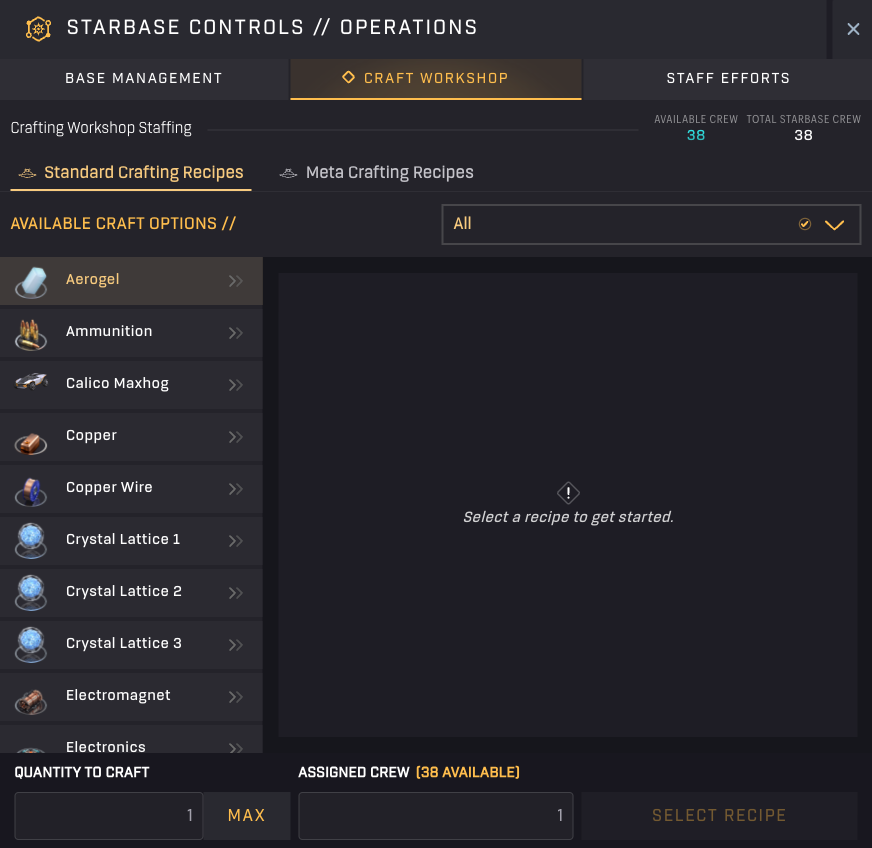
Starbased – Crafting (CSS)
The drop-down menu at the top allows you to filter the list of recipes based on the Starbase Tier required to craft them. This is useful if you want to quickly learn which recipes you can still craft at the various other Starbases out there without needing to explore those one by one instead.
Clicking on a recipe on the left-hand side will show you the input required to craft that specific item. You will also see the Crafting Fee required per item crafted.
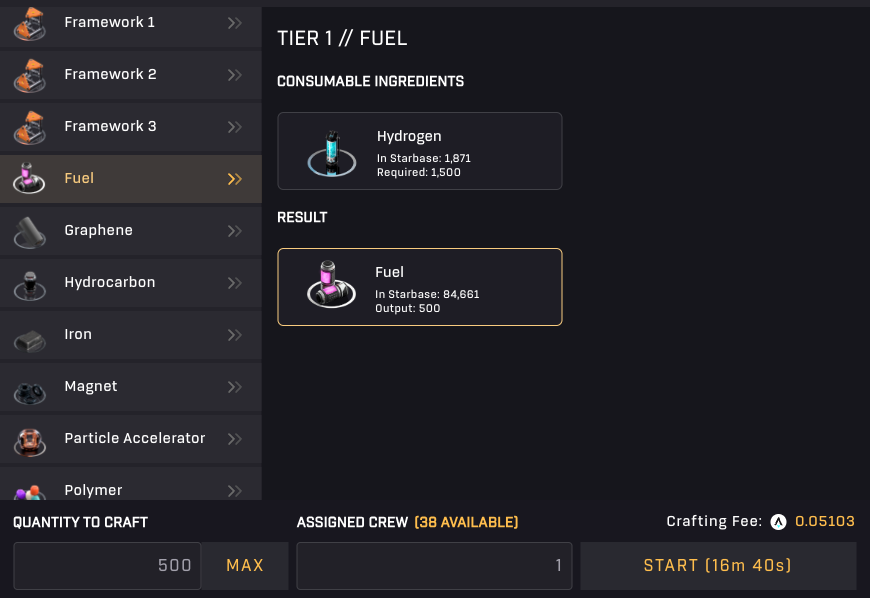
Starbased – Crafting UI
The Start button will become enabled when you select a recipe for which you have the input ingredients and all the other requirements (at least one available crew member and enough ATLAS to pay the fee). More importantly, it will show you the time it will take to finish the crafting job.
By increasing the quantity of items to craft, the time needed for this job will go up. You can bring it down again by adding more crew to the task. You can add as many crew members as are available, but note that adding more crew members than the quantity you are crafting does not speed things up. Crew members are not able to collaborate on a single item. In other words, if you want to craft a single item, having one crew member or 100 is not going to matter. One crew member is enough as it will take as long with one as with 100.
Of course, not only the completion time but also the crafting fee goes up when you increase the quantity. Both of these –time and fee– scale linearly with the quantity crafted, so there is no specific optimal amount you have to look for.
When you are satisfied, feel free to hit the Start button!
Managing Crafting Jobs
After you initiate a crafting job, there are two ways to track them. The first is in the same Operations dialog and can be accessed by selecting the Staff Effort tab instead. You will see an overview of all Crafting jobs, the quantity being produced, and the amount of time remaining.
This is the only place where you can cancel the job. Cancelling the job will refund all input materials and the ATLAS fee. There is no way to get it to complete some, but not all. Even if you cancel at the last second, all of your input will be returned to you.
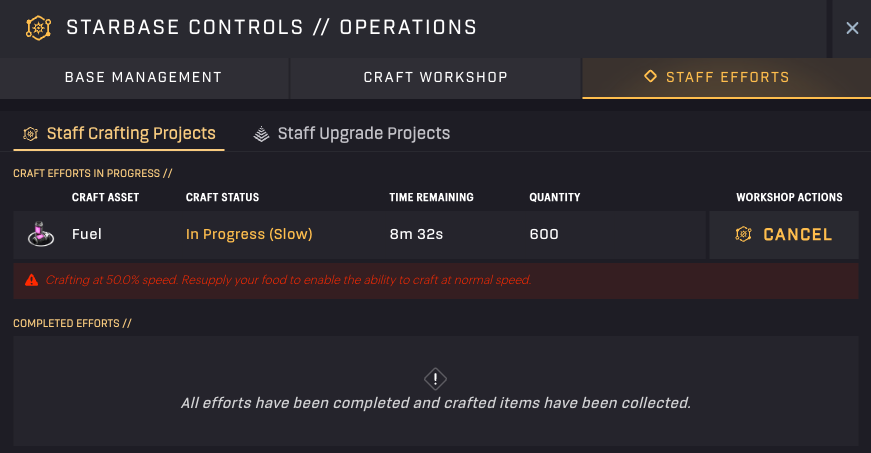
Starbased – Operations – Staff Efforts
Note that this dialog will only show you the crafting jobs that are running at that specific Starbase.
An alternative way to keep an eye on all of your crafting jobs is through the Asset Overview dialog (also used for scanning). You can make it appear by the Show Overview toggle hovering over the top right of the map. On the very first Crafting Process tab, there is a list of all Crafting Jobs at all Starbases.
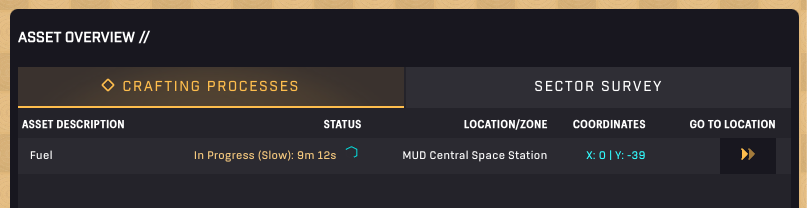
Starbased – Asset Overview – Crafting Processes
You can click the double arrows at the far right behind a line to select the sector where that specific job is being worked on. This will immediately update the Starbase Controls in the left sidebar, allowing you to jump straight into the Operations and the Staff Efforts overview we mentioned earlier. Here, you can glean more details and (optionally) cancel the job.
Completing Crafting Jobs
There is one final step to perform when crafting, and that is to claim your products after the job has finished. You may expect your products would be directly added to your storage at the Starbase, or even into your wallet, but that is not how things work. You need to claim the products, before they become available through your storage at the Starbase.
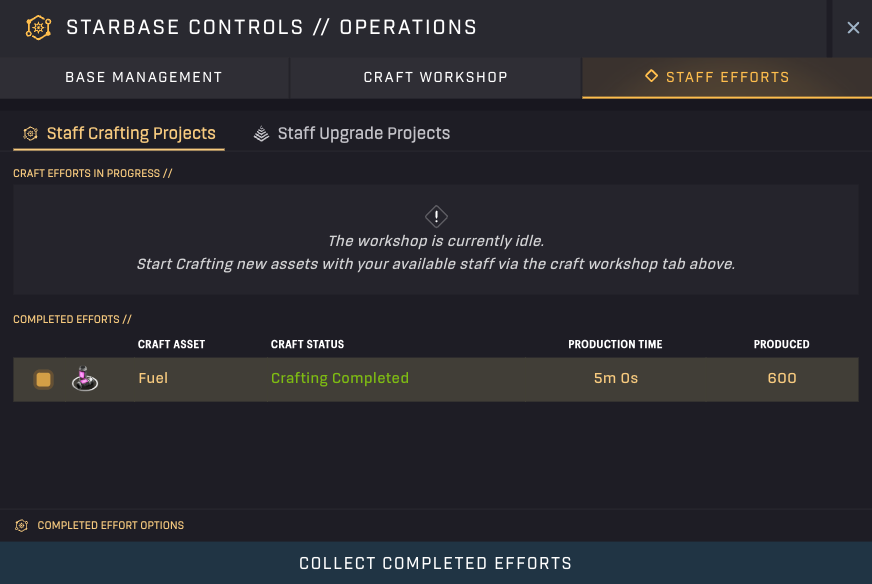
Starbased – Operations – Staff Efforts
To do so, head back to the Operations of the Starbase in question and go to the Staff Efforts tab. Besides ongoing crafting processed at the top, there is also a segment for completed crafting efforts at the bottom of this dialog.
Simply click the job(s) you want to claim and click the Collect Completed Efforts button at the bottom of the dialog.
Now, the products can be found through the Local Inventory of the Starbase (Controls), where you can, for example, load them up on fleets.
Ship Crafting
Starbased offers a simplified (compared to the future) way to craft some ships. It works exactly the same as crafting any other item, and the ships themselves can, in fact, be found among the recipe list at the CSS.
At the time of writing this guide, only two ships are available to be crafted, the Calico Maxhog and the Fimbul Mamba EX. These are the two ships that the team does not plan on selling to players directly. Instead, they will only ever be available through gameplay, such as this crafting mechanic in Starbased.
Below, you can see the recipes for both ships. They clearly list Tier 6 as their requirements, which means these are only available at the Central Space Station of your Faction.
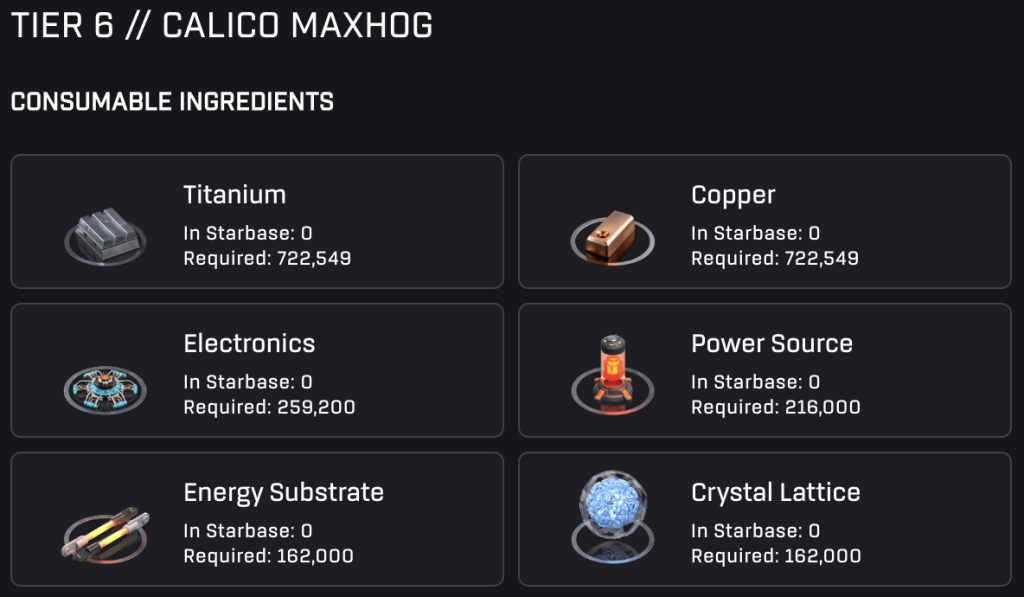
Starbased – Calico Maxhog Recipe
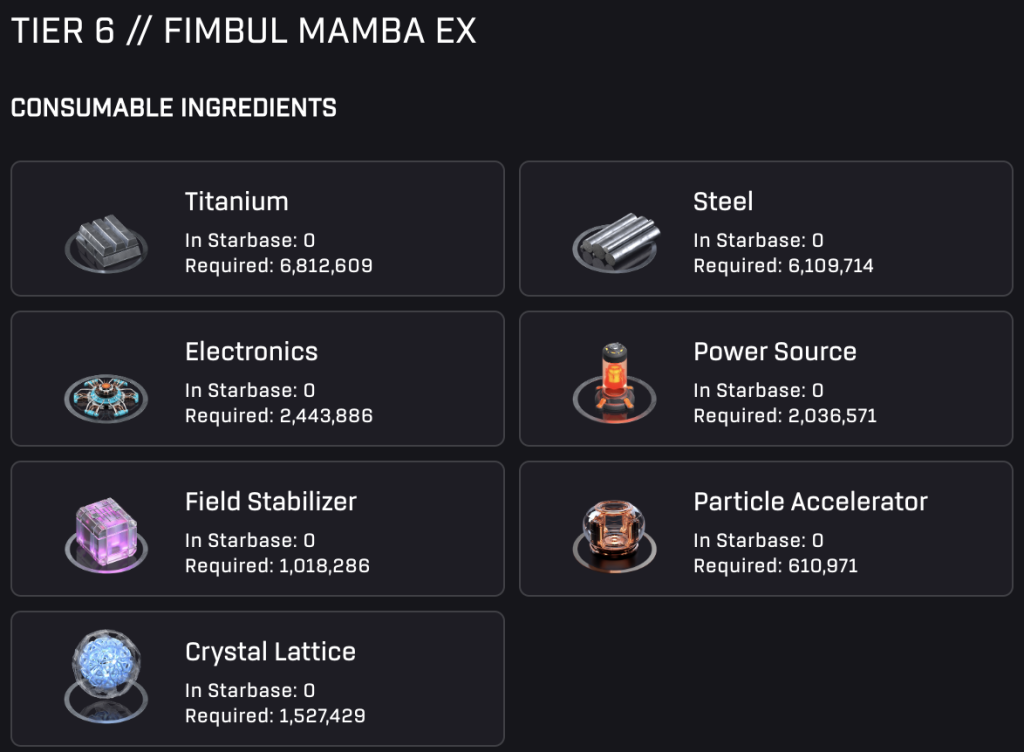
Starbased – Fimbul Mamba EX Recipe
Meta Crafting Station
Beyond having ship crafting recipes, each Faction’s CSS also comes with a special crafting station dubbed the Meta Crafting Station. Here, you can craft items that exist outside the official Star Atlas ecosystem and are instead owned (and offered) by 3rd parties.
You can access this by selecting the Operations option in the Starbase Controls for your Faction’s CSS. Then, select the Craft Workshop tab at the top. You will start at the Standard Crafting Recipes (secondary) tab, but next to it, you will see the new Meta Crafting Recipes option. Click on it to access the new Meta Crafting Station.
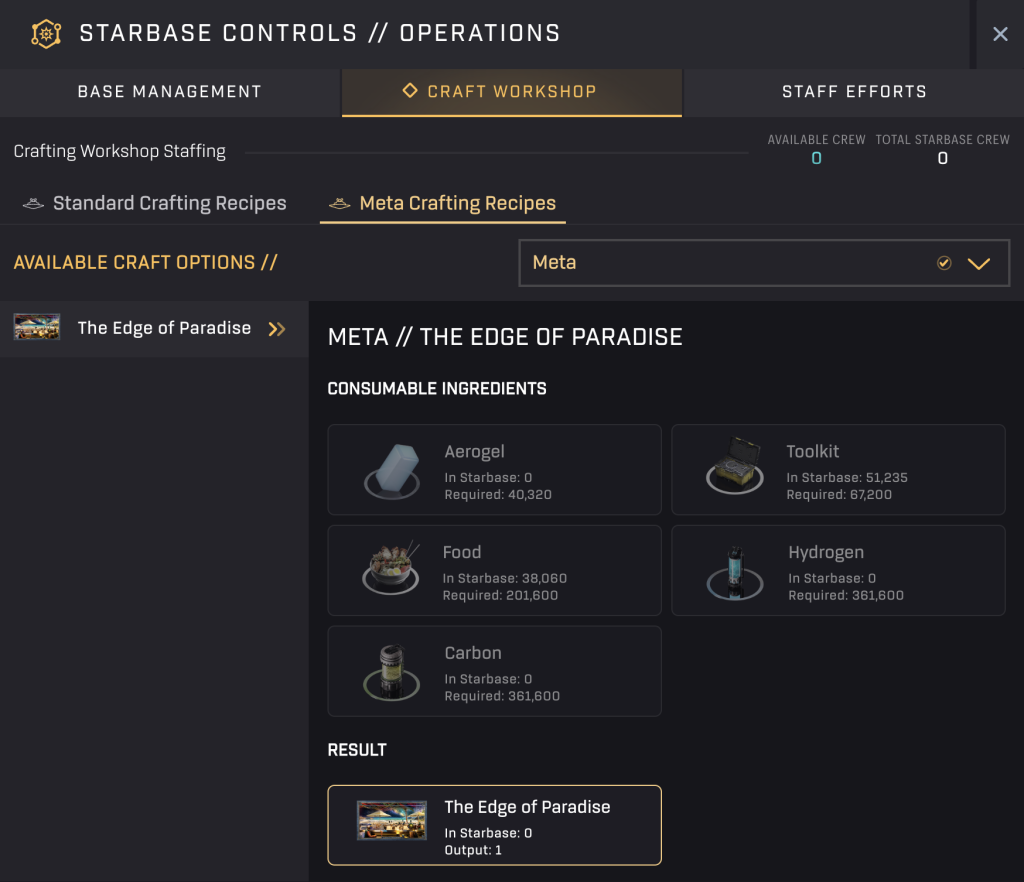
Starbased – Meta Crafting Station
Other than being in a new tab, Meta crafting works exactly the same as the Standard recipe crafting.
Note: Sometimes, a recipe may not be available. However, the team is constantly in talks with many potential partners, so keep an eye on the news (for example, through our weekly Star Atlas newsletters).
You’ve reached the end of Part 2!
Go forth and have fun in Starbased!